Confessions of a First Time Restorer – Part 7

Part Seven – Close and I’m having the cigar anyway!

I can’t believe that 3 months have gone by. Apologies for the lack of an article in the last 2 editions. Firstly, I was waiting for the tinware to come back, and then, I was ill with the plague – or a ‘viral infection’ as the doctor told me (the run-to condition when doctors haven’t got a clue what’s wrong with you – apologies to the doctors out there). It wasn’t Covid, but it was definitely some form of absolutely debilitating man-flu/plague/wrath of the Gods that had me flopped on the sofa for 2 weeks. This didn’t give me enough to write about in July and then the August edition was already full.

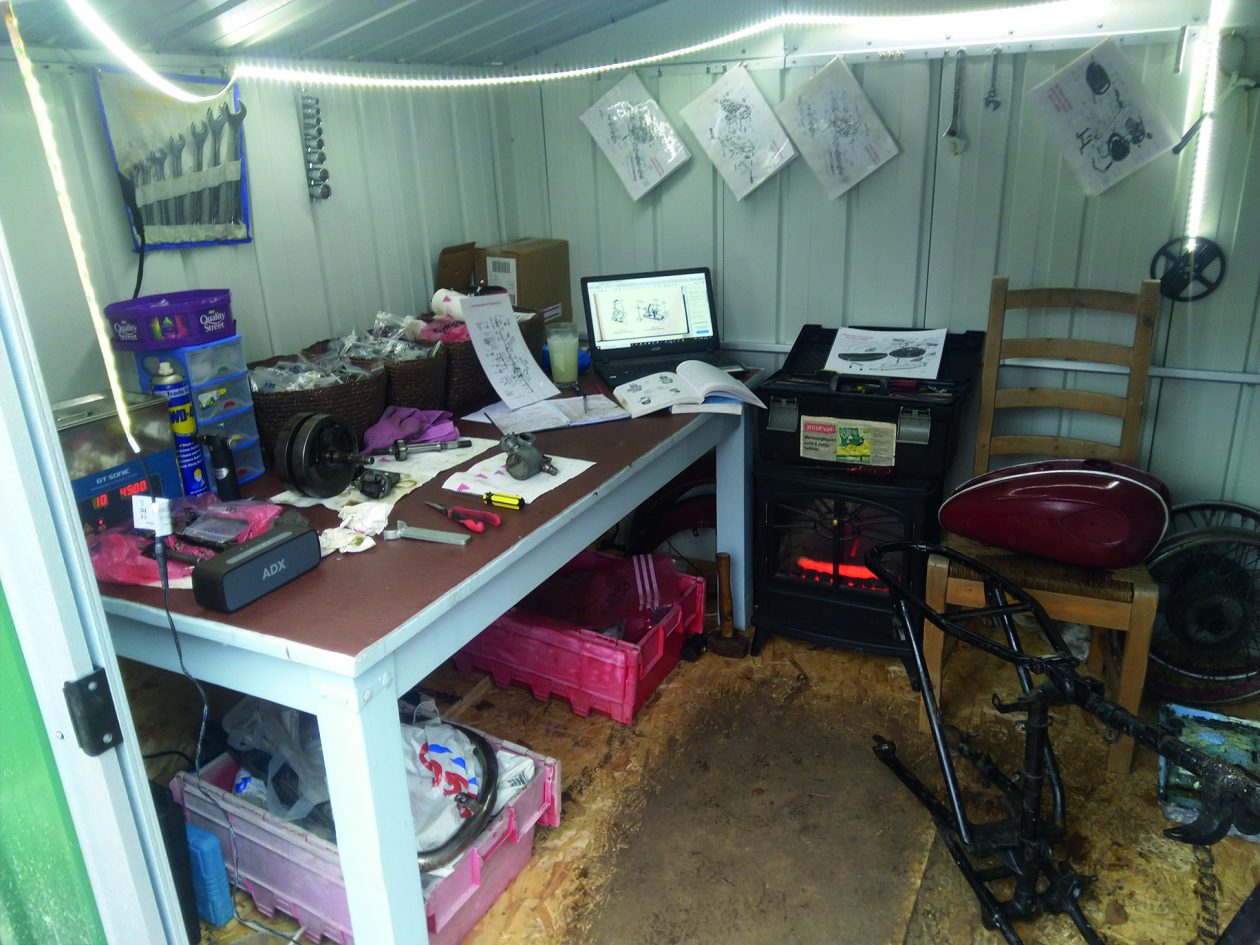
So, let’s catch up. The engine was back in the frame and I was waiting for the tinware to come back from Mike at Triple C. I had bits I could do whilst waiting for the tinware, but not much. Assuming there weren’t too many tasks that I had to take apart and re-do, that is.

The engine was nearly complete. I needed to do the valve clearances, the piston rods, the distributor and the carburettor. On the assumption that the valve clearances are correct, they were remarkably easy to do. The piston rods? I have heard of people buying an endoscope to do these before, and I can understand why. I don’t have one and it took about three hours of loosening the rockerbox, swearing, moving things around, swearing, resetting the rockerbox and trying again before it was eventually correct. People reading these articles must think my language is terrible. I can assure you it isn’t. Working on a classic bike just makes you swear! The two go together like Kirk and Spock.

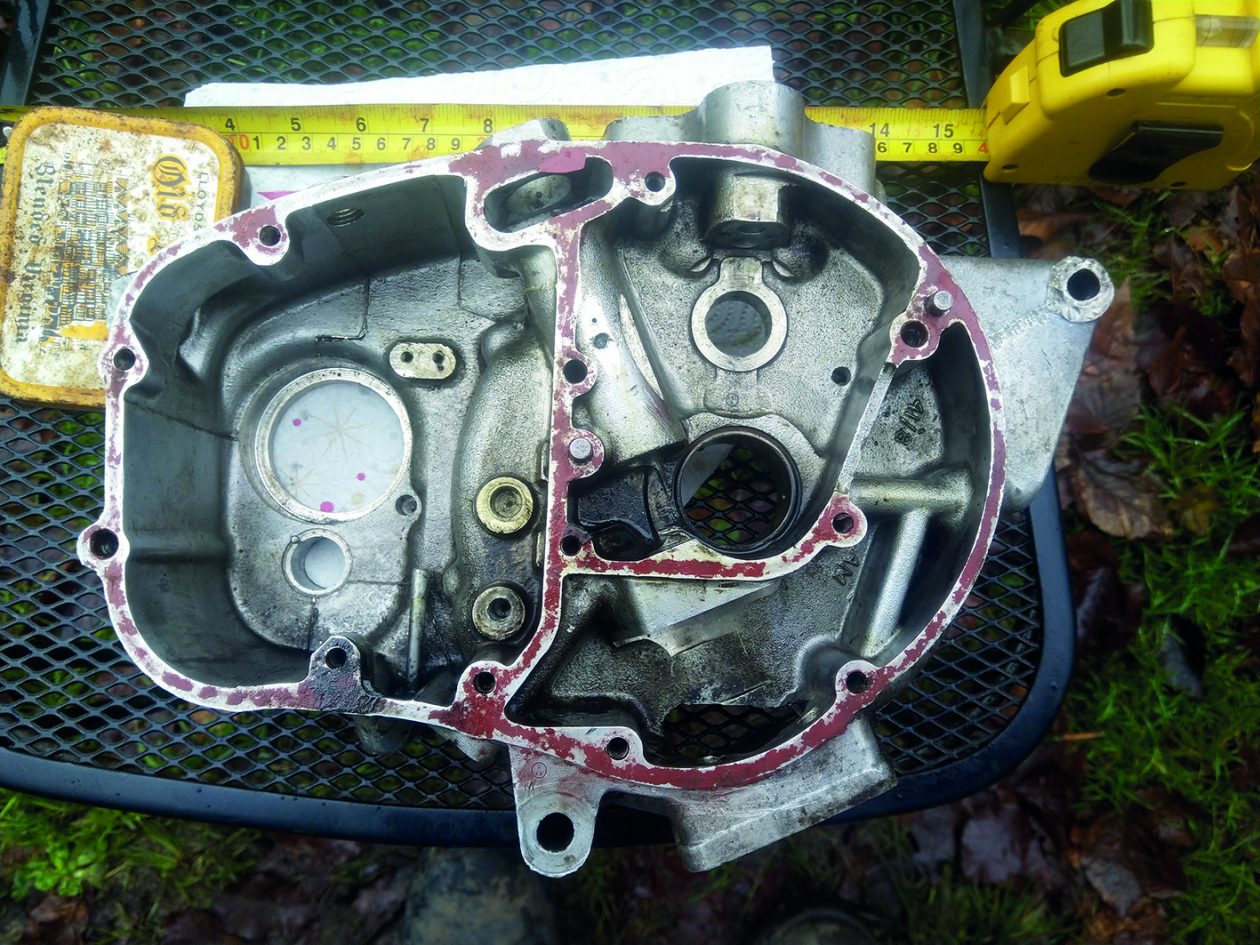
The end can and the battery were ordered. Thinking of the electrics made me look closely at the point where the three wires from the stator connect to the loom. I was not convinced I had connected the three of them correctly. Research and advice soon yielded the information that these needed to be connected in a very specific and complicated (for me) way. And, yes, you’ve guessed it. The only way to check this was to take the primary chaincase cover off and remove the stator. I refer you to the penultimate sentence of the previous paragraph!

bsa c15 exhaust
Exhaust downpipe

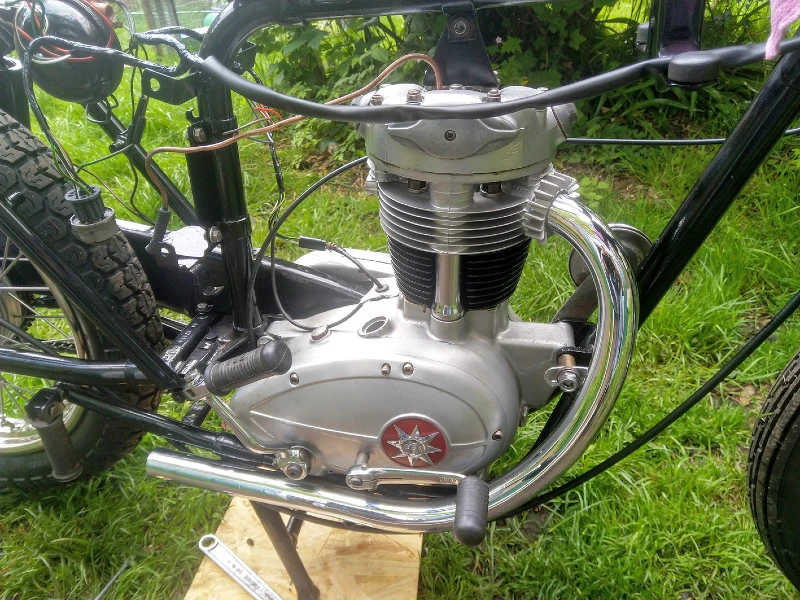
Anyway, it was a good job I had thought of this as upon removing the primary chaincase I discovered that I had it wired incorrectly. I proceeded to wire things up correctly, and a much better job was made of the soldering I’m pleased to report.

On to the distributor. Something else that I knew absolutely nothing about. I had no idea what it was even for. Research and advice from Mr. R time. I stripped the distributor and decided that the only thing that was needed was new advance springs which reduced costs significantly. They were bought and the distributor assembled. I’ll find out if I was correct when I try and start the bike.

On to setting the timing. I played around, getting a feel for it and the science behind this. I understand the basics of it now and got it to a place where I thought it was correct. Again, we’d find out when the engine was started.

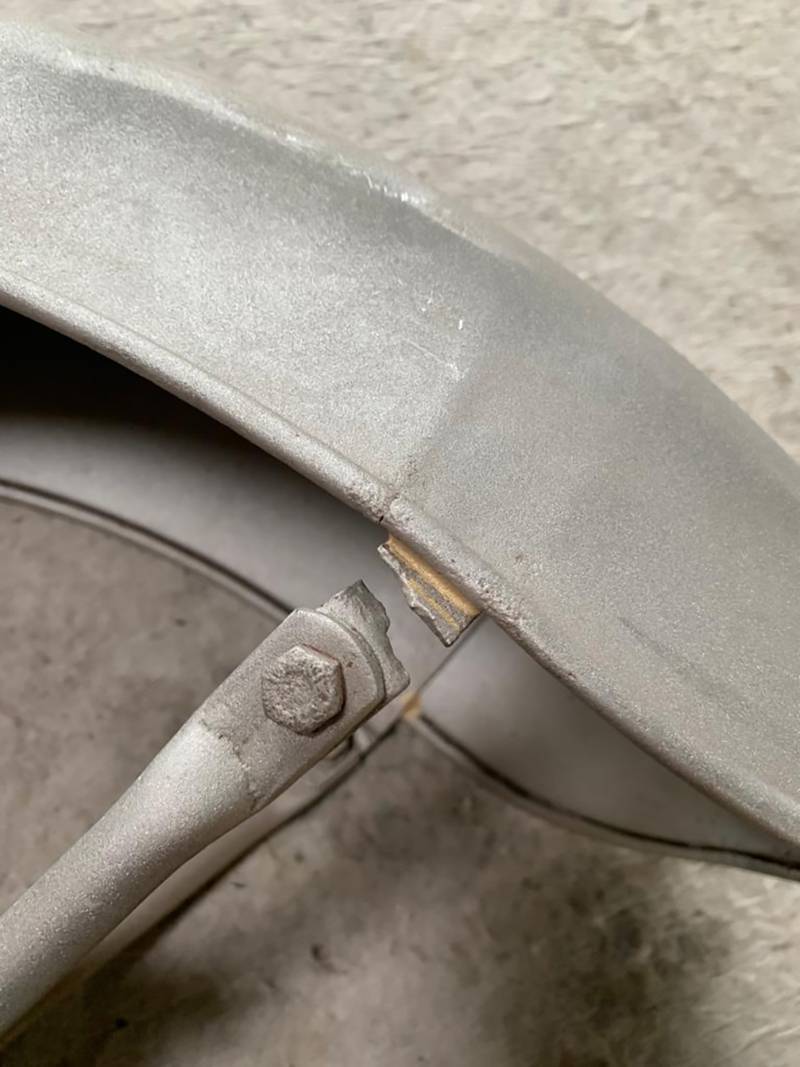
I tightened up the Allen bolt to hold the distributor in the selected position……and the thread on the distributor clamp gave way! Nooooooo. This clamp is buried in the depths of the engine. The thread on it had been fine when I put it in place two or three months ago. This was panic inducing – potentially a major setback on up to three months’ worth of work. I hit the internet and my advice gurus to find out if there was a way around this. Unfortunately not, I needed to buy a new distributor clamp and replace the existing one in the middle of the engine. That was enough for that day. I’d had enough. I packed up, and went and sulked inside!

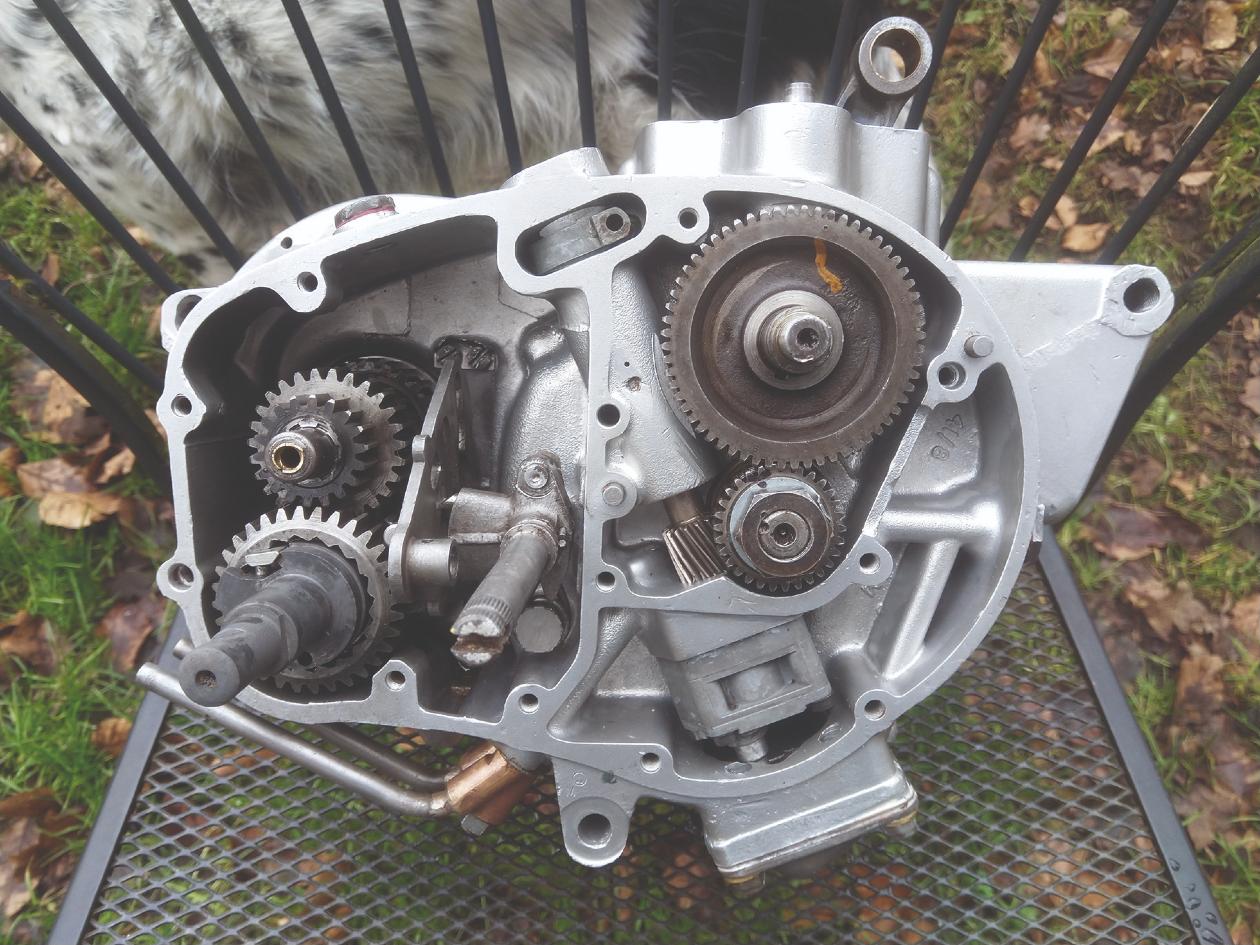
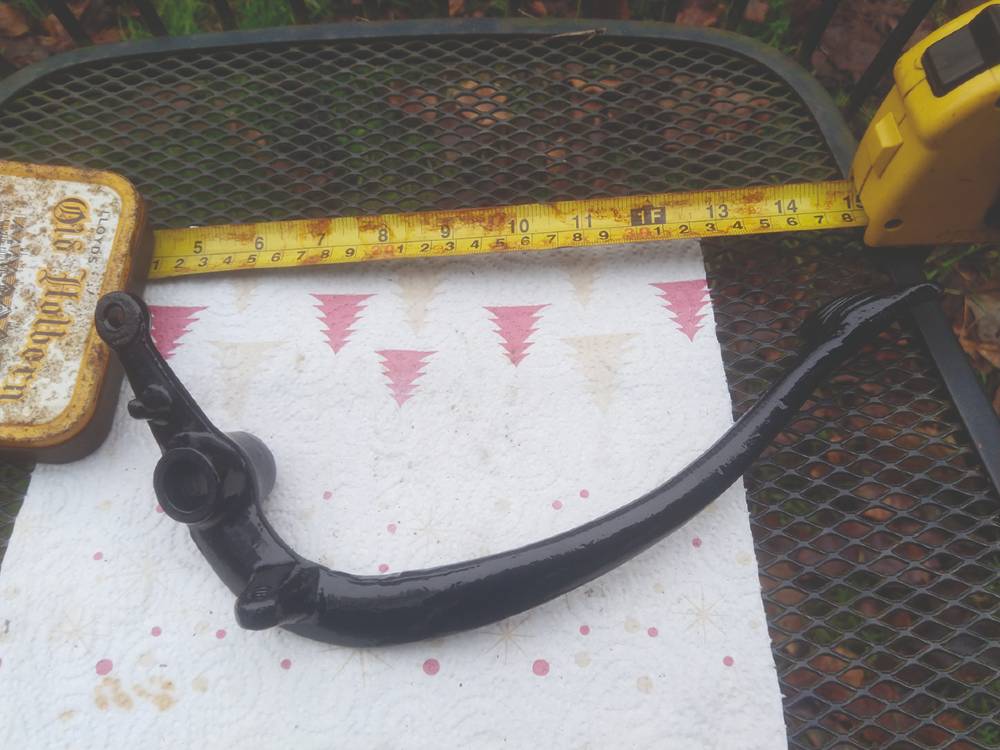
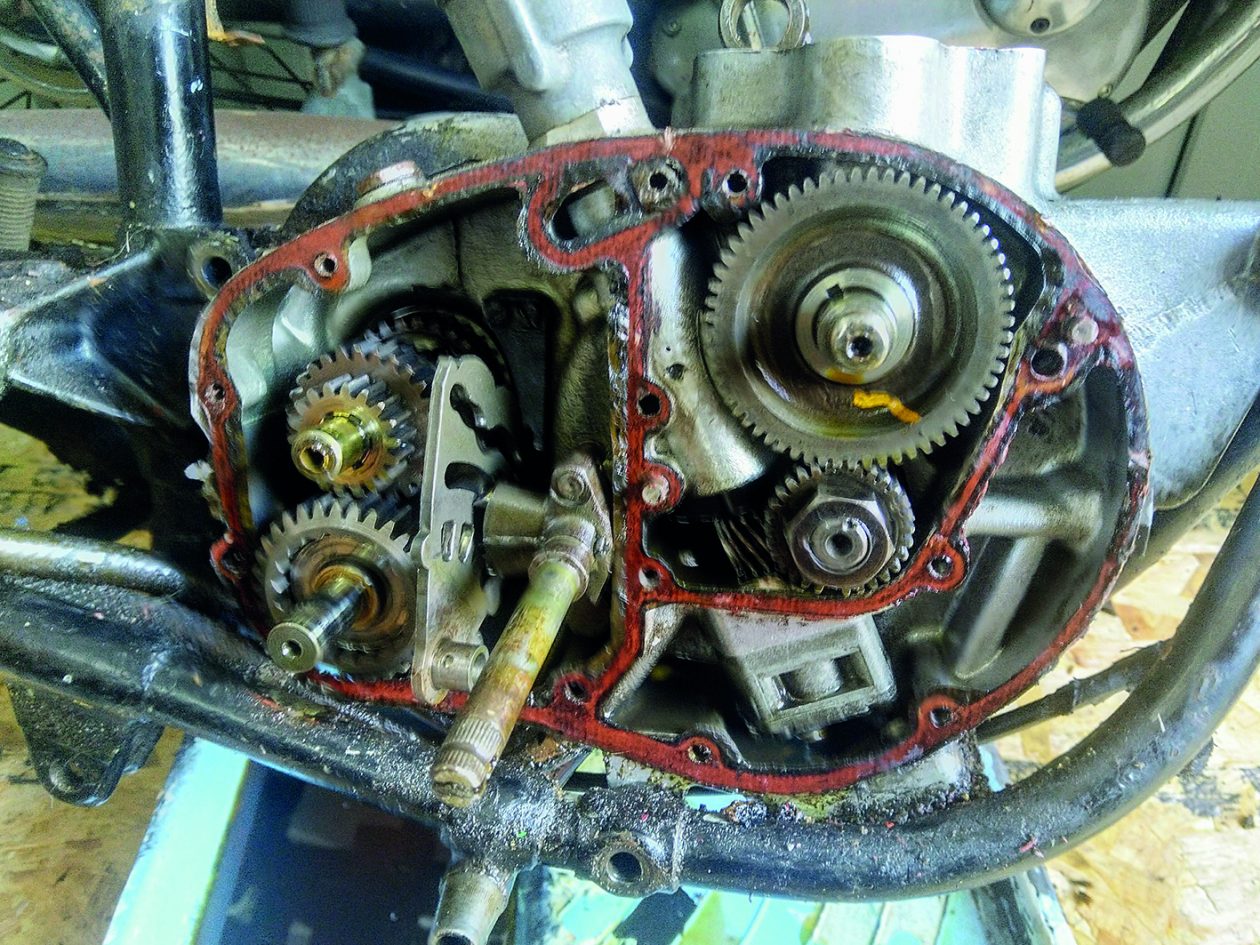
I had discovered another of the wonders of BSA design. The clamp that holds the distributor in position is in the depths of the engine next to the gears (an early part of the assembly), yet the retaining screw goes in through the outer timing cover – one of the last pieces to go in place. This makes distributor adjustments easy but causes problems if the clamp fails. As I said, I’d even checked the clamp before putting it in place, but obviously not thoroughly enough. So, to replace it I had to take off the newly-installed exhaust system, the pegs, the gear shift and kickstart pedals, remove the outer cover, dismantle the kickstart and gear change mechanisms, and remove the inner cover. Removing the inner cover obviously meant that one of my nemeses – the gearbox – came apart as well. I even had to loosen the engine in its frame mounts. There were very nearly tears at this point. To do all that assembly work on the engine had taken me weeks and weeks. I had to take apart 1/3 of the engine to get at that one part. Surely this could have been designed better?

On the positive side of things though, what had previously taken me weeks took me an afternoon this time. It brought home to me how much I’ve learned and what a difference it makes when you actually know something about what you are doing.

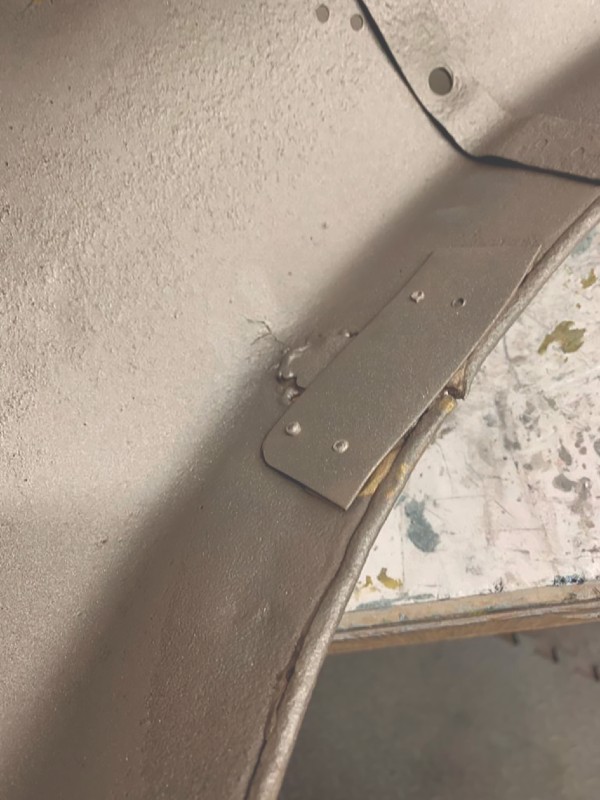
Of course, things couldn’t go completely smoothly though. That would be too easy. Upon re-re-re-re-re-assembly another thread went on the bottom engine mount and the kickstart cotter pin broke.  Both fortunately external parts. I got the relevant parts from Dave (Mr. R) and quickly had the bike back to where it had been, but with an installed (and hopefully correctly adjusted) distributor.

bsa c15 oil tank
Restored oil tank
bsa ca5 restored tinware
Restored tinware

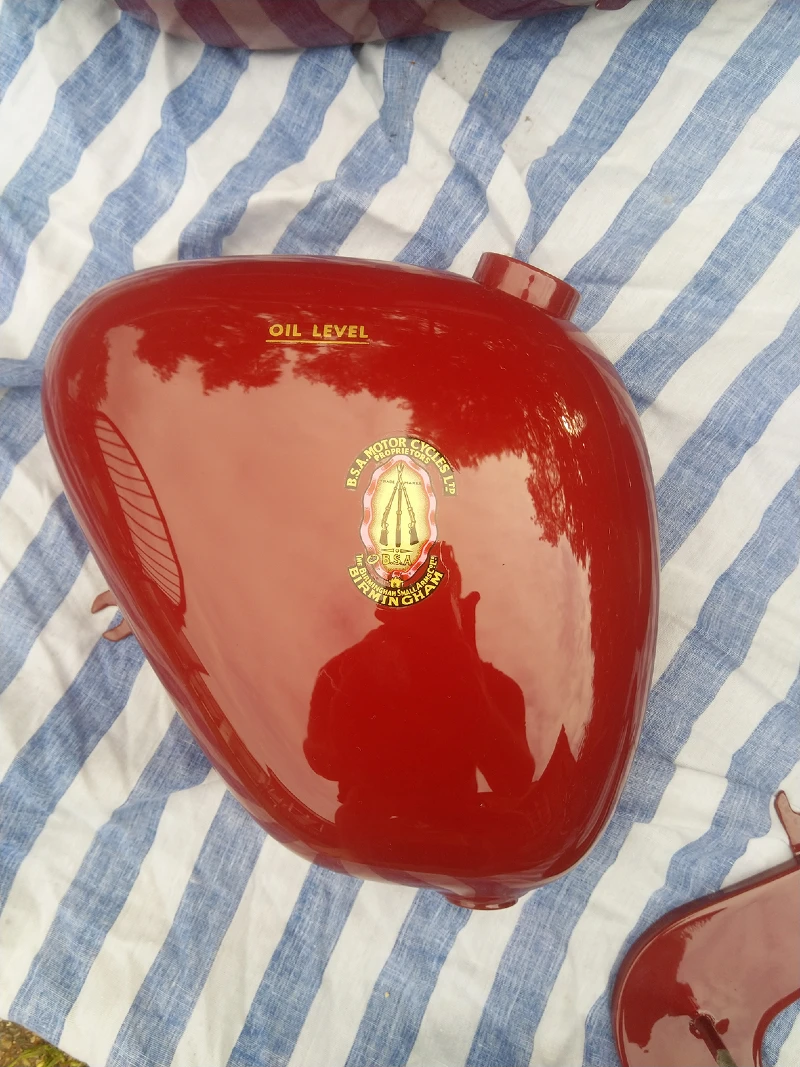
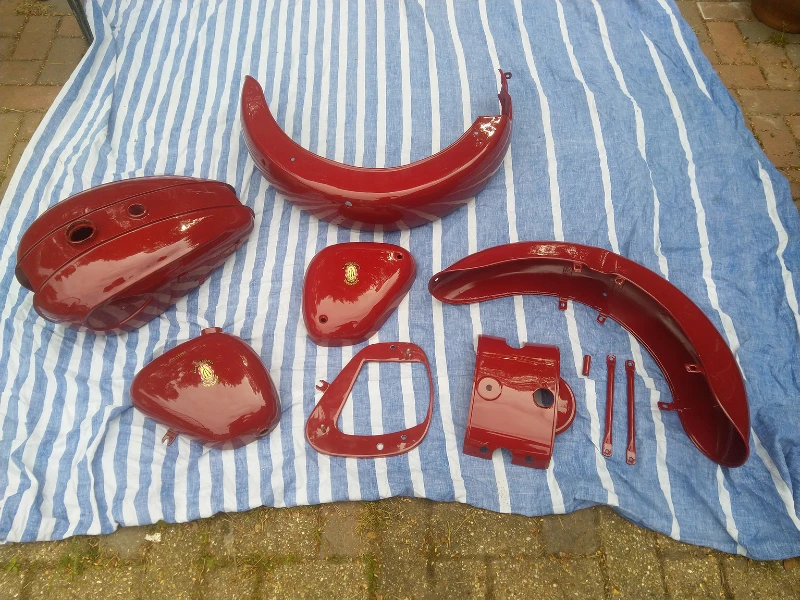
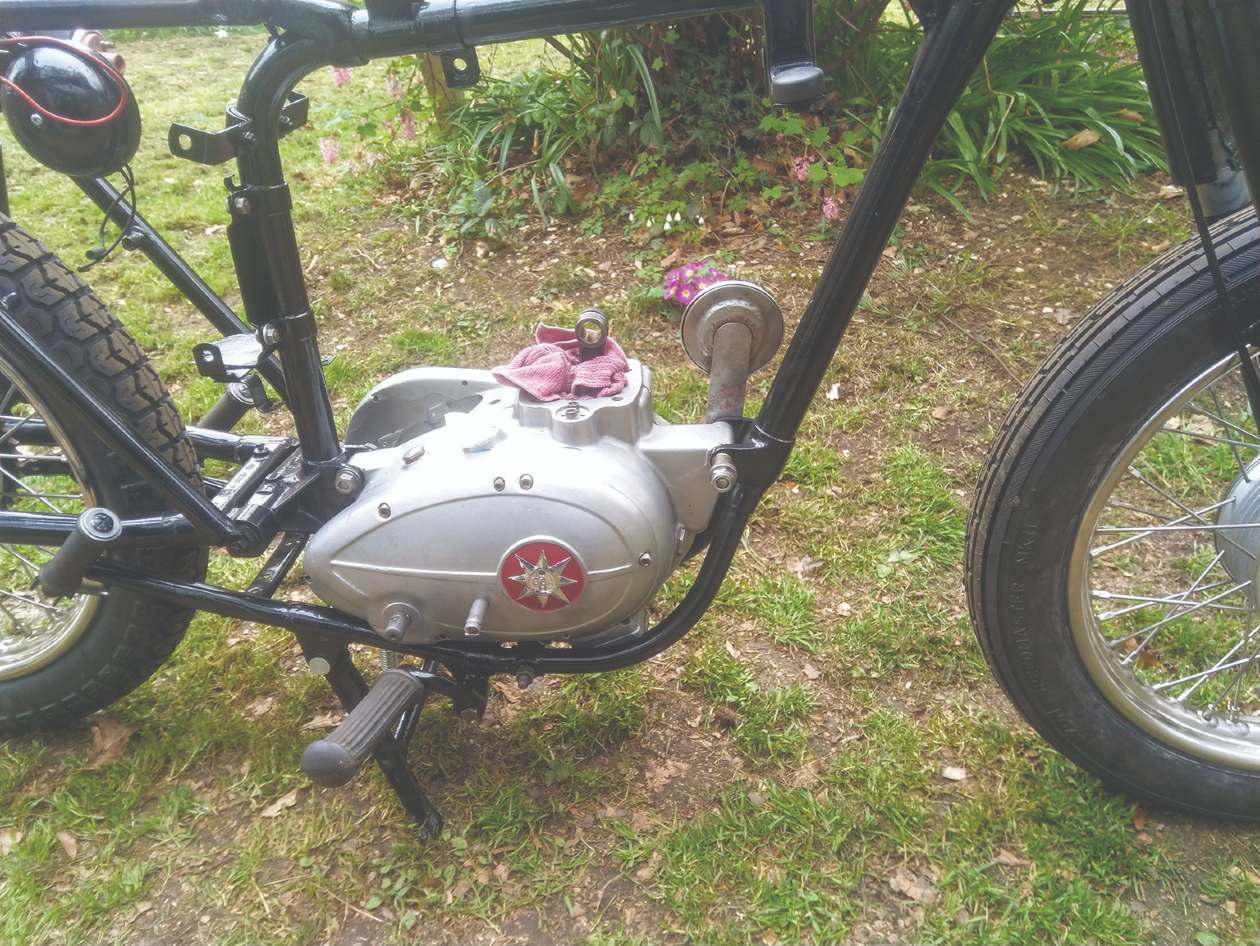
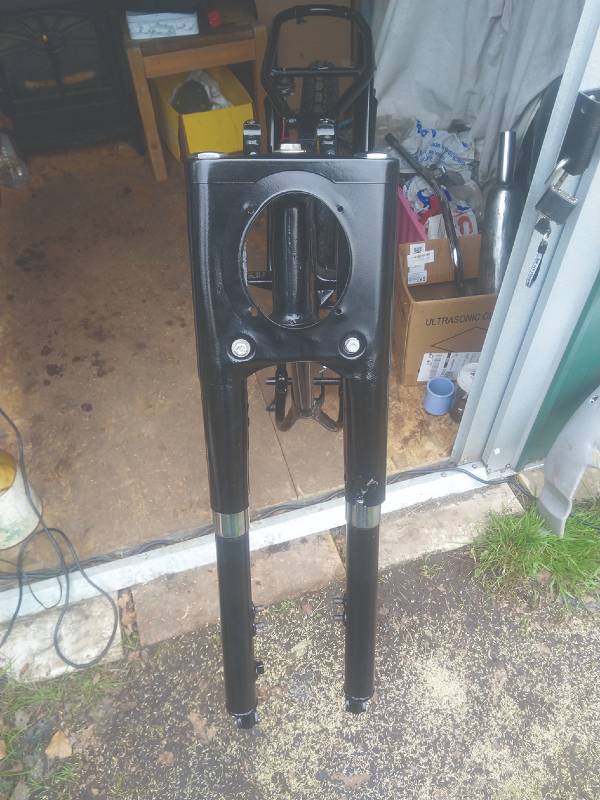
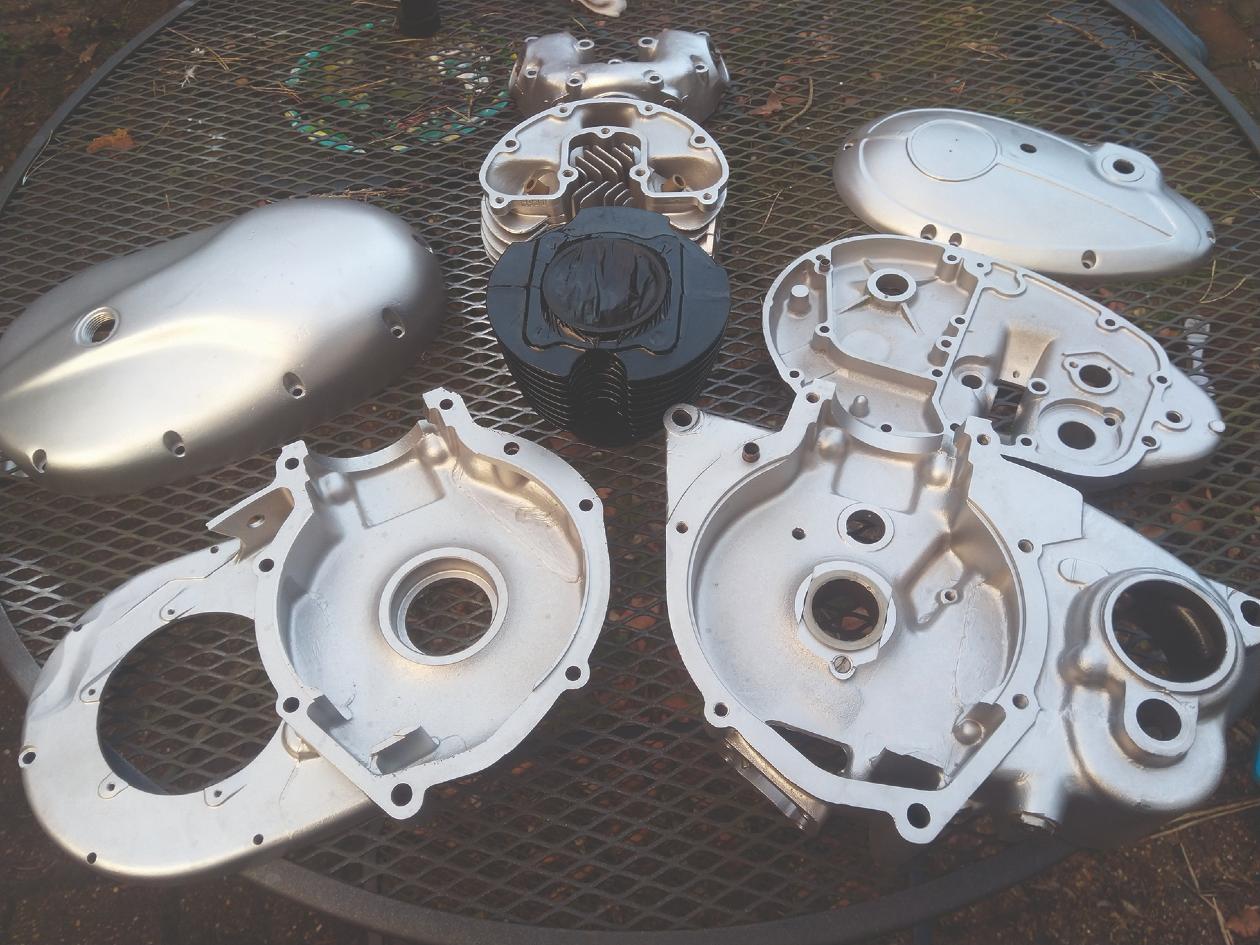
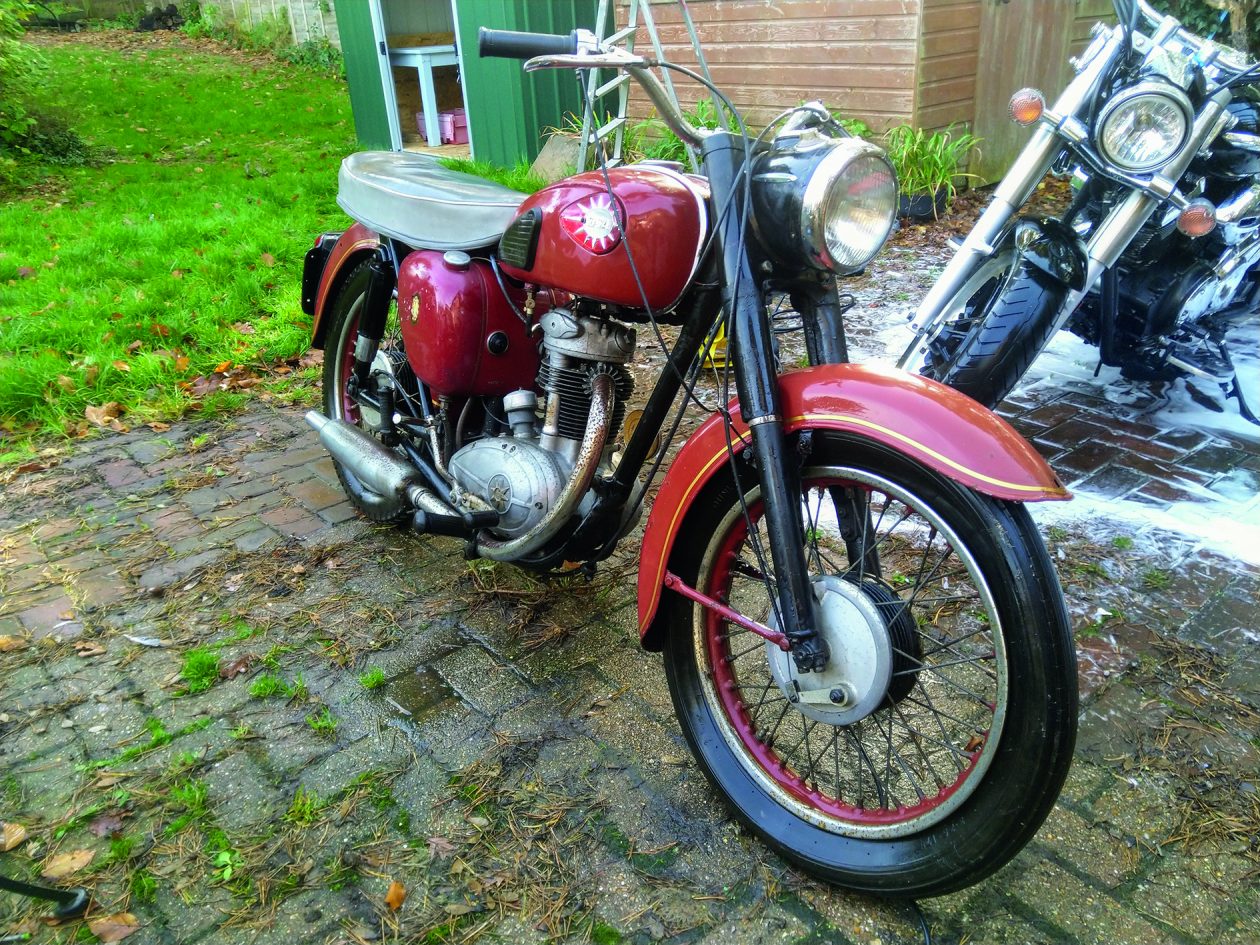
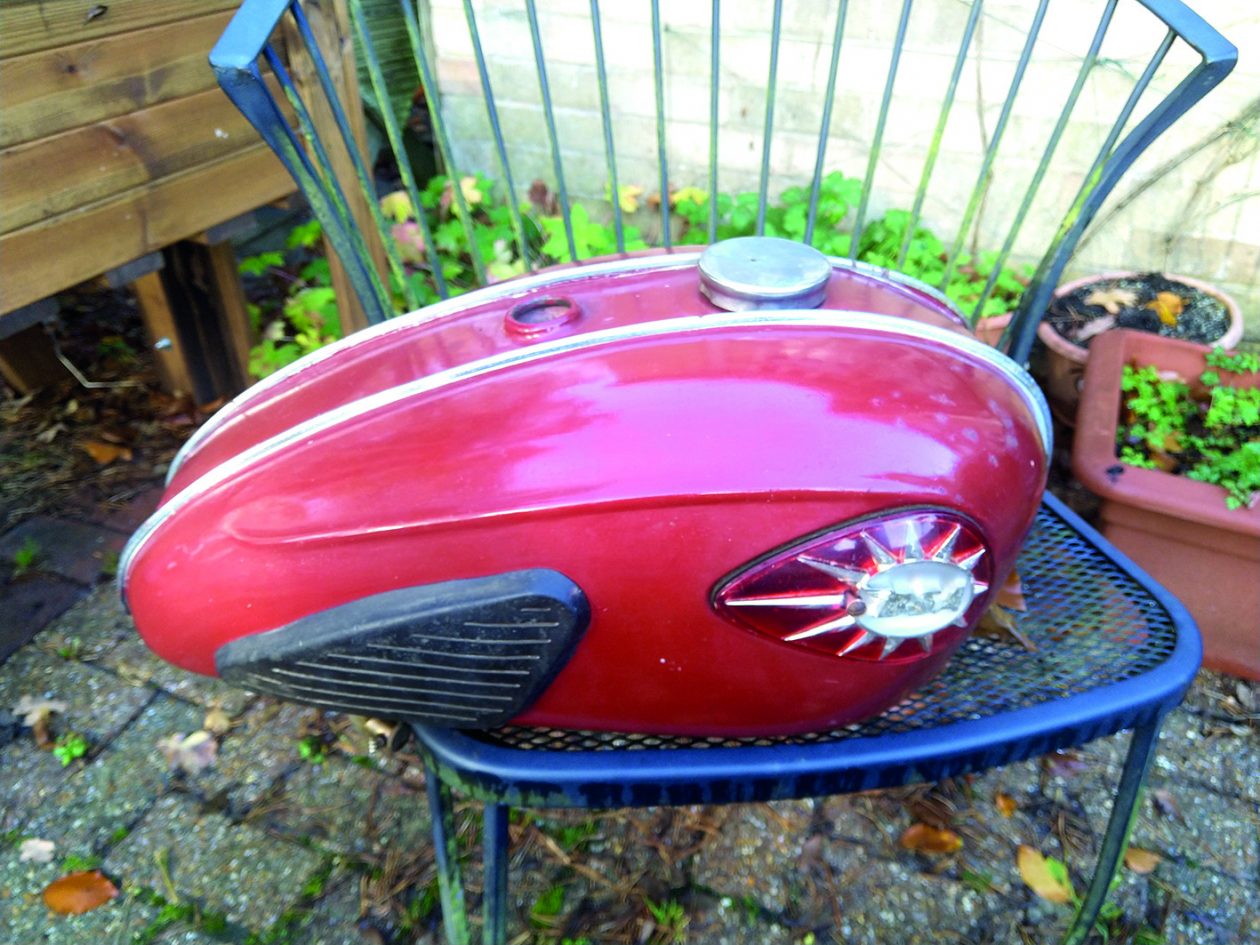
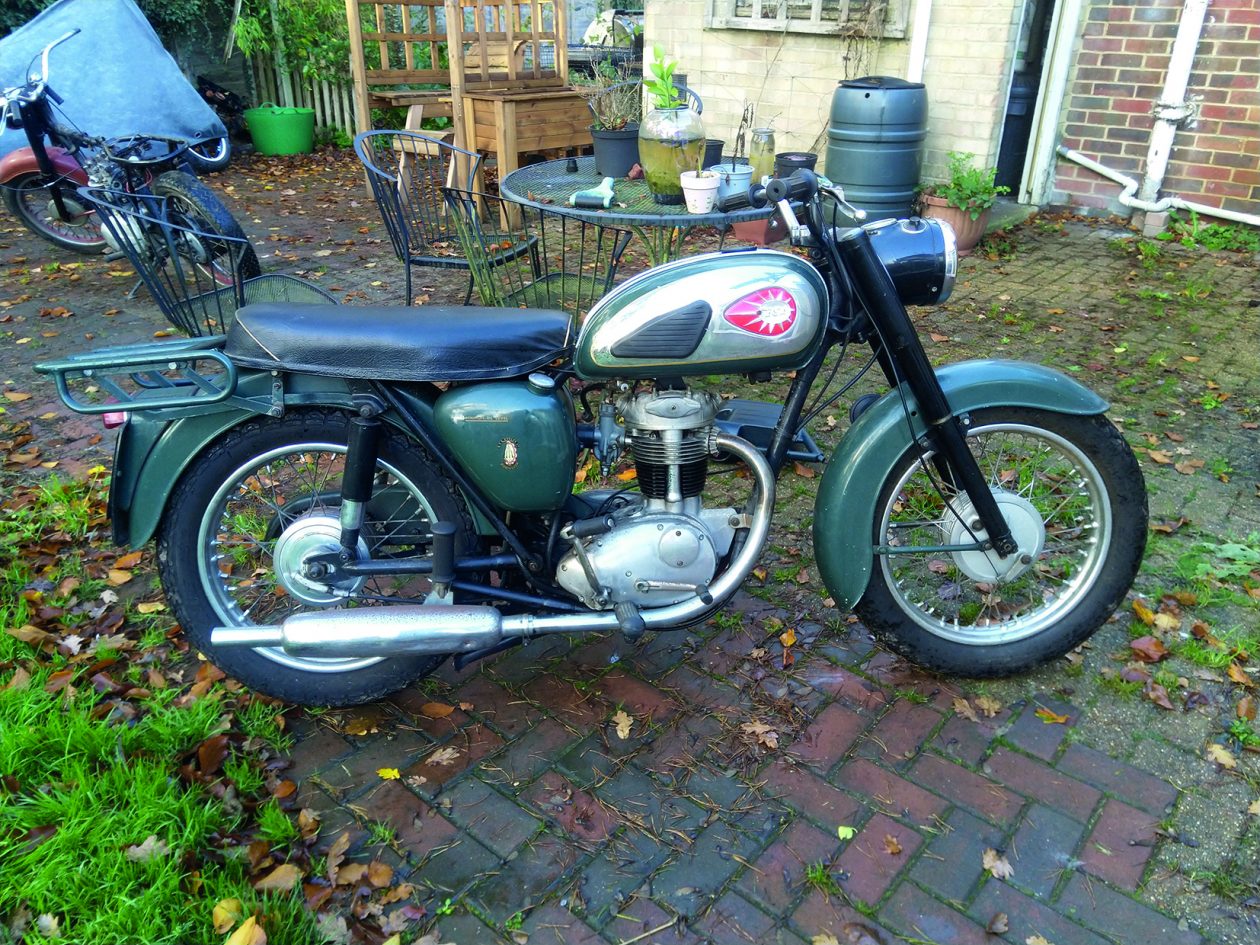
Finally, a long-anticipated day arrived – I got the tinware back from Mike at Triple C, and, to put it bluntly, it looked stunning. What an amazing job he did. The parts look absolutely gorgeous without even being attached to the rest of the bike. I was going to have to be really, really careful putting these on the bike. The last thing I wanted was a scratch.

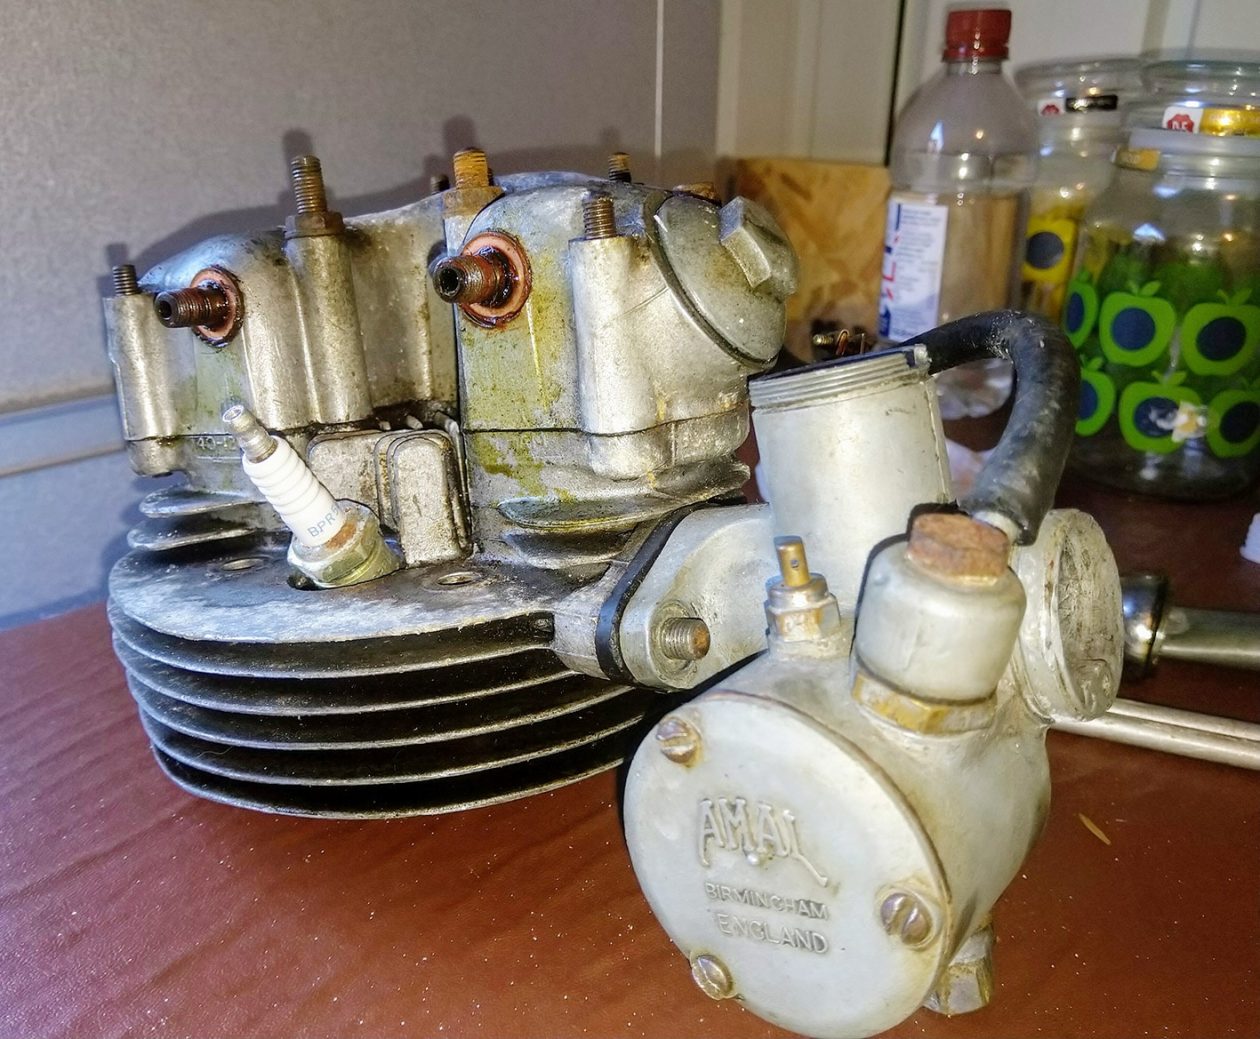
I could now start putting these parts on, but before I did I wanted to dismantle and inspect the carburettor.  To that end I took half a day to read about and carefully examine all the individual components. I’m glad I took the time to do the reading as I needed some new parts that I wouldn’t have got without the research, like a float bowl cover. A previous owner had over tightened this cover and distorted it. This would have most likely have led to a fuel leak in the future, not something you want really! Carburettor parts were ordered as well as numberplates. I also ordered something that would probably be very useful in the future, something that we couldn’t find when collecting the bike – keys!

While waiting for these parts I assembled the petrol tank and the rear lighting / numberplate holder on the rear mudguard. And, again, marvelled at how fantastic the tinware looked.

The numberplates arrived and were put on to their relevant mudguards (being an old fart I refuse to call them fenders!). I then quickly had the centre panel and the rear mudguard on the bike. The carburettor parts arrived, and the carb was assembled and attached to the bike in its initial setup. This will need to be altered later as modern fuels are different to the ones used at the time the instructions were written.

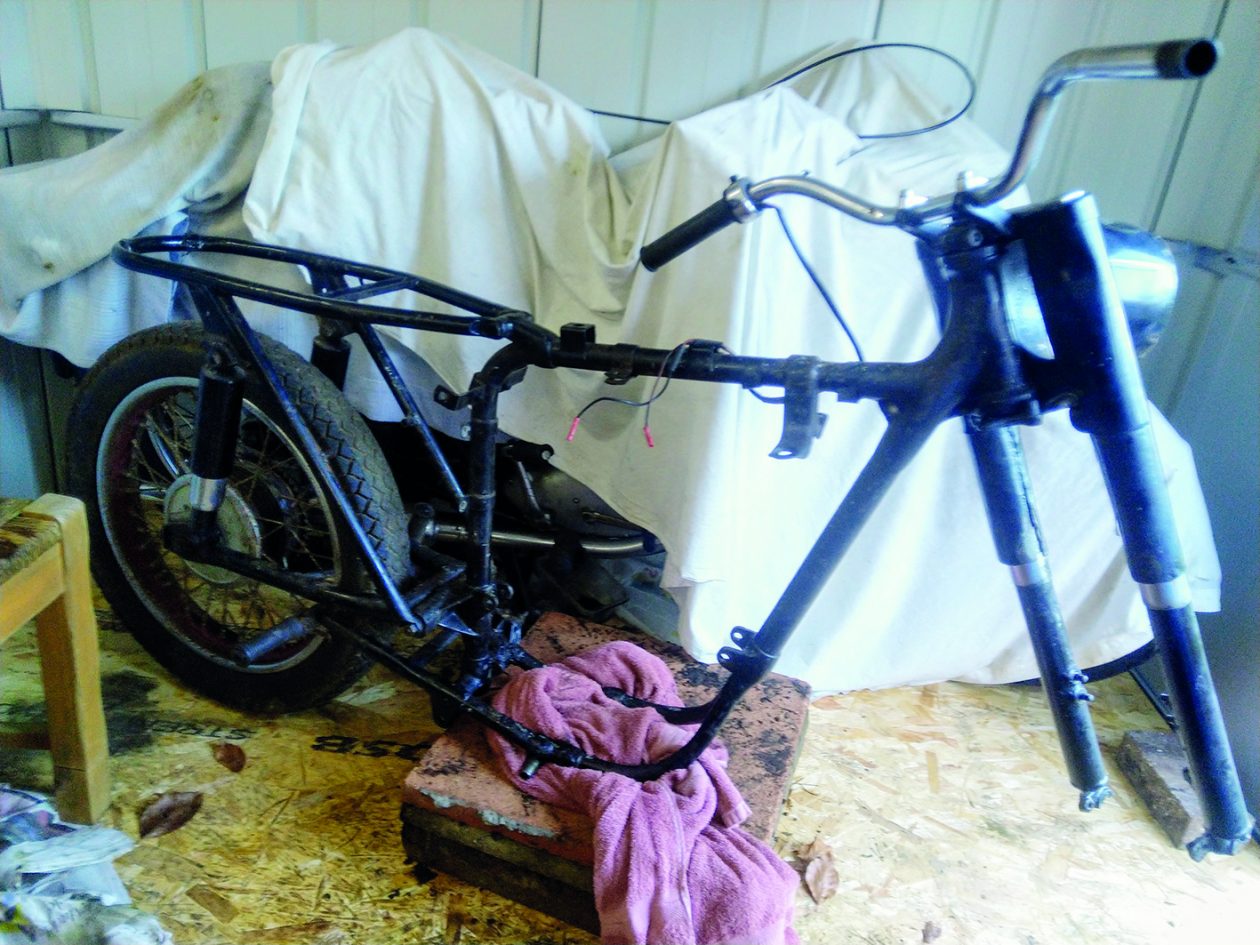
The next parts were the final ones and I was starting to get excited as the end of the restoration was in sight. Or was it fear at the thought of trying to start the bike after all this time, effort and learning (and swearing).

That was by-the-by though, as at this point I came down with a severe case of the plague, and lay moaning and groaning on the sofa for 10 days without the slightest bit of sympathy. What a heartless family I have! All I got were quips about man-flu and being a wimp.

bsa c15 oil tank in situ
Restored oil tank in situ
bsa c15
Seat on

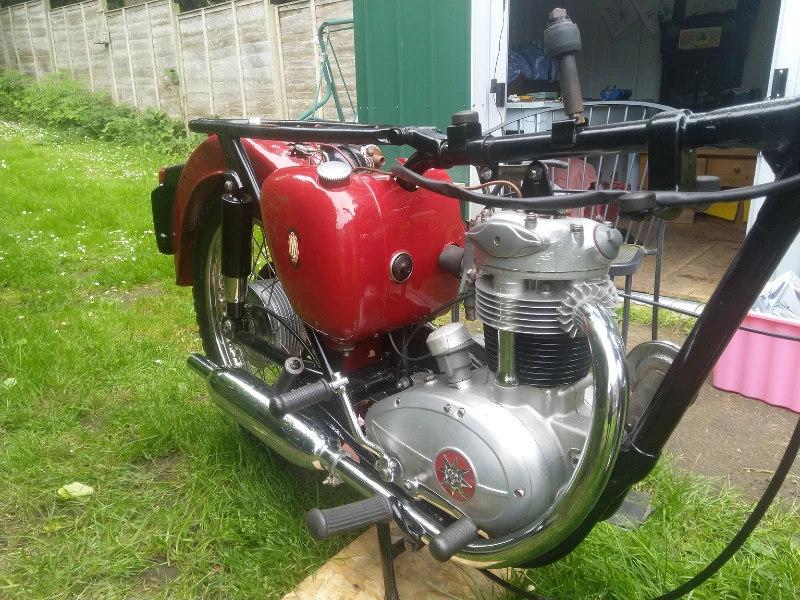
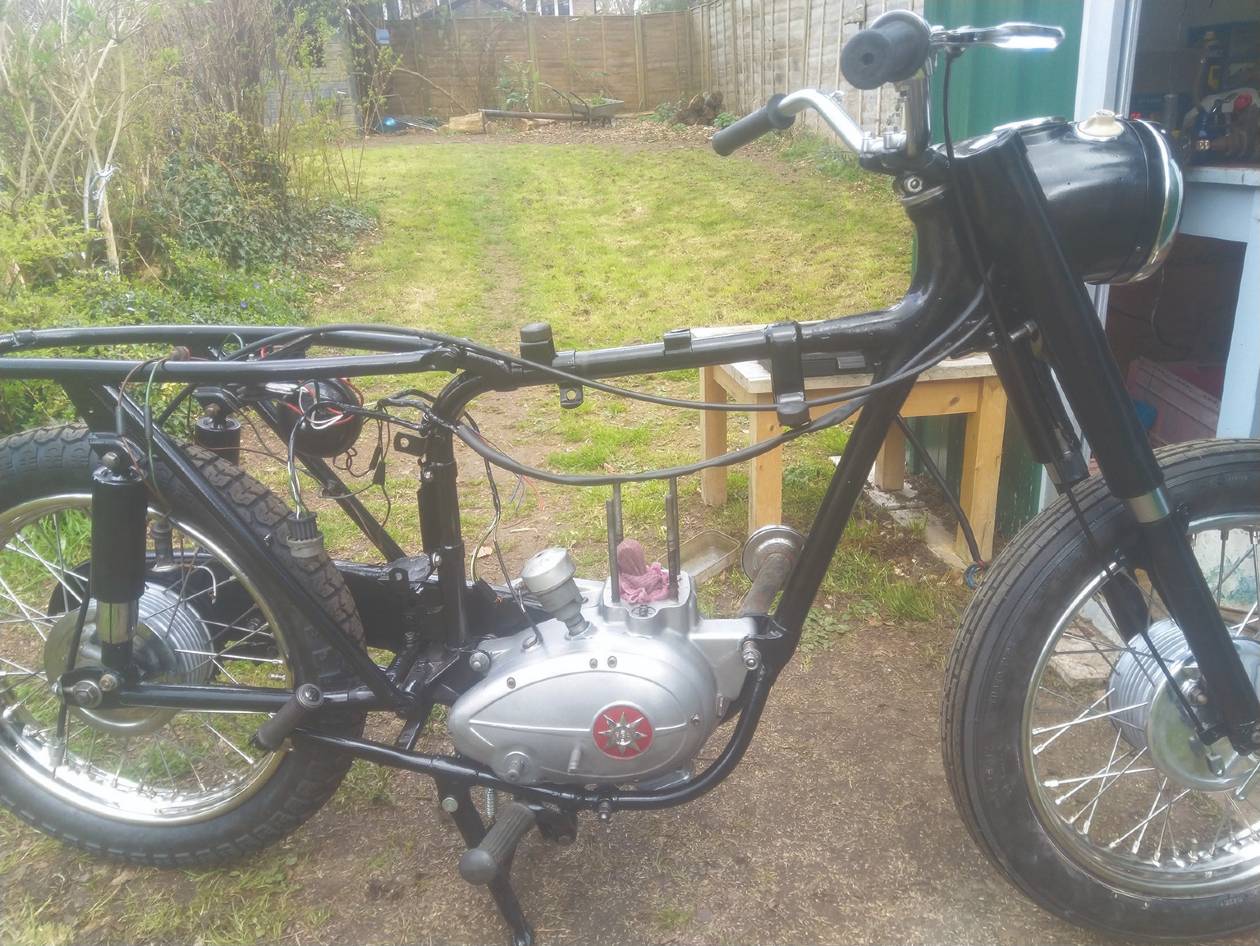
Once recovered swift progress was made. The oil tank was fitted and connected, the remaining decal was done, and the front mudguard went on.

At this point I decided to wire up the battery and check all the electrics.  This could be interesting! But overall I was pleased with my electrical efforts. I needed a new bulb for the rear light as the existing one was a 12V bulb and the bike is 6V. I also discovered that the ignition coil was dead. Like the distributor clamp I had checked this when it came off the bike and I thought it was okay, but it obviously wasn’t. Two other bulbs did not work, but I realised that this was because they weren’t earthed – I told you I knew nothing about wiring! That was soon sorted and once the new bulb and ignition coil arrived all the electrics worked correctly.

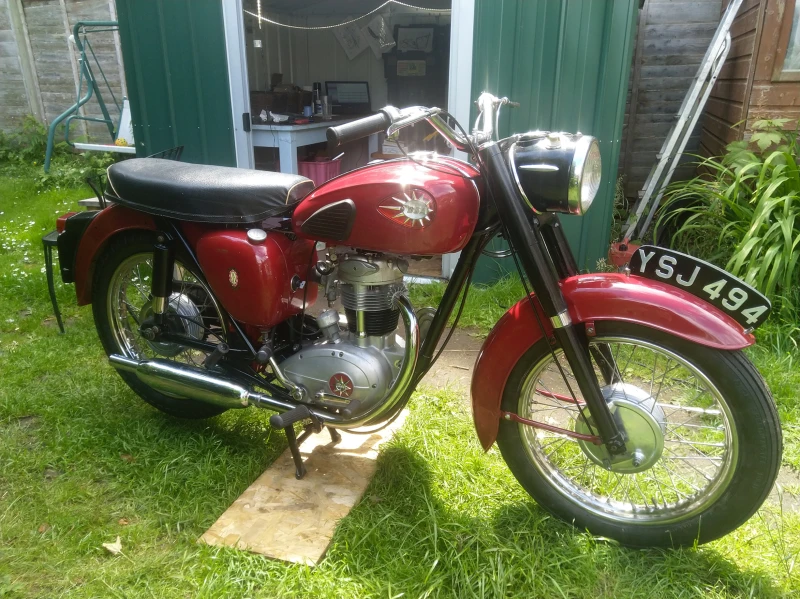
Only two things were left to go on the bike – the petrol tank and the seat (which I had resprayed underneath for protection).

They went on and that was it. The restoration part was complete.

Now it was time to get it running and roadworthy, so some oil went into the bike and I waited to see how much came straight back out. Three parts of the bike have oil, so I did this over three nights. This would allow me to trace any leaks. First in was the chaincase – no leaks. Next was the gearbox and, again, there were no leaks.

Finally, I needed to get oil into the oil tank and use the kickstart to move this oil all around the engine. 400 kicks or so later no oil was coming back into the oil tank. Some slight disassembly showed that oil was going all round the engine but simply not managing that final bit back to the tank and the scavenger to the rockerbox. There were no blockages. I finally decided that this was because the insides of these pipes were both very clean and very narrow.  Due to the viscosity of the oil I thought that liquid to surface friction might be causing this. I removed the necessary pipes and forced oil through them. Once reattached this initial friction had been overcome and the oil came through nicely. Again, I left this overnight and there were no leaks. 

Finally, fuel. I put a small amount of petrol into the tank and it came straight out again at the bottom! Some quick action with a cup collected most of this and then I had to do some cleaning up and let things evaporate. Investigation led me to something I had heard about but hadn’t twigged was applicable to my bike. I discovered a cork in the petrol tap under the tank which had dried out and shrunk over the years. Boiling it in a pan of water for half an hour and then leaving it to soak overnight in petrol and it was back to its proper dimensions. Petrol went back into the tank and the tap worked nicely. And the petrol came straight back out via the carb! This leaking from the carb was my first encounter with something that would become a recurring theme for me – I hadn’t tightened things up enough. In my fear of damaging parts by overtightening them I had gone to the other extreme. Carb parts tightened and no leaks. That meant that the next stage was…….first start!

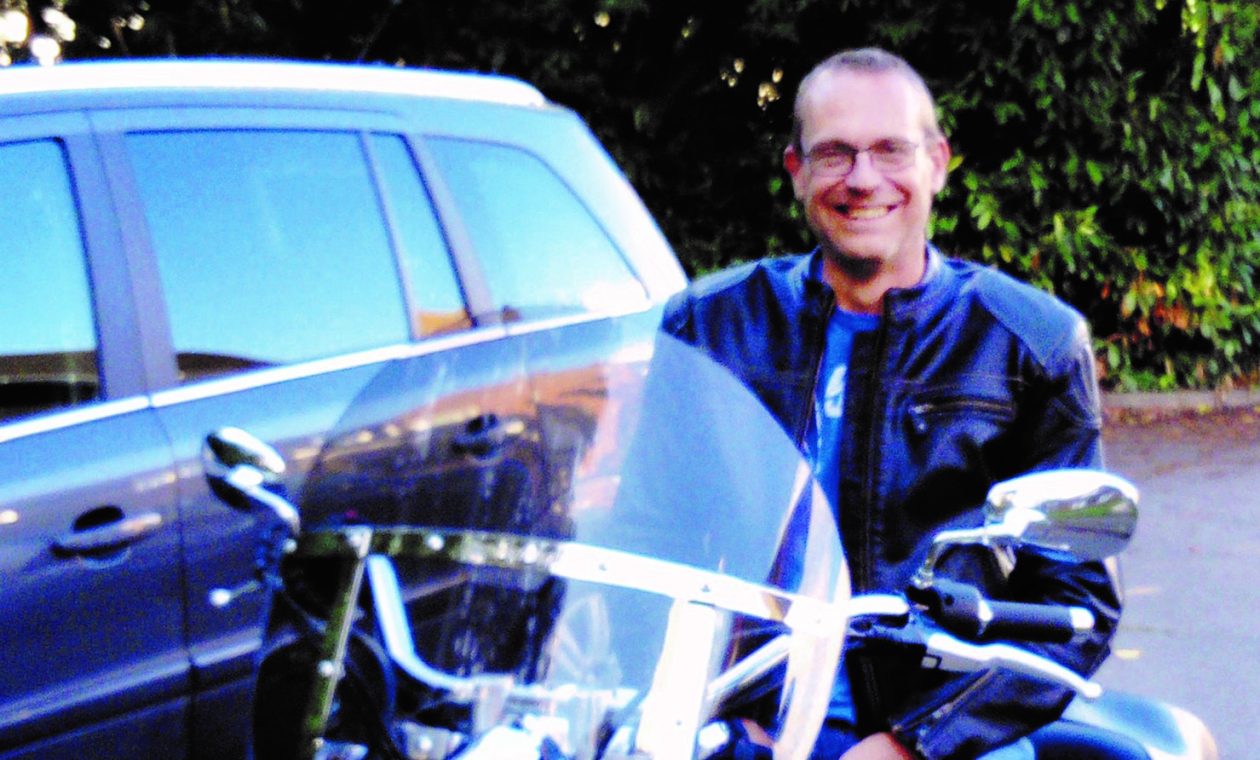
All was set. I had the bike nicely positioned. Sharon and my daughter Emily, were there to watch and film things. I gave the bike its first kickstart – nothing. Many kicks later we switched off the video as I wasn’t getting anything, not even a hint of the engine starting. It was disheartening. It was at this point I remembered to turn on the ignition! 10 kicks later and the bike burst into life. Glorious, fantastic, amazing. The bike lived.

Okay I had to have the throttle fully open and oil seemed to be coming from everywhere, but the bike ran. What a feeling. And what a lovely sound.

I had expected the bike not to run for long. That was because I was going to have to do all the necessary alterations to the timing and the carb to get a sweet running engine. But I wasn’t expecting oil to come out so much, especially after it not leaking earlier. The pressure of the engine running was obviously forcing the oil out. Repeatedly starting the engine led me to three leaks – the primary chaincase cover, the sump plate and most worryingly the outer timing cover. This was worrying because there shouldn’t be sufficient oil in that area for a leak to occur.

New sump plate parts sorted that leak. I’d tried to get away with not replacing them and it hadn’t worked. The Primary Chaincase needed a new gasket due to the number of times it had been taken off and put back on.

The outer timing cover leak was traced to the camshaft breather. Initial thoughts and advice led me to the oil pump which might need lapping. So, I did this (for a first ever time) and managed to completely overdo it and killed the oil pump (I might have sworn at this point). A new oil pump was bought from Mr. R and all was reassembled, but still the leak was there. I also noticed that oil was coming out of a drain hole in the wrong direction. The pressure is too high in the engine. Investigations into this are continuing, it appears to have people stumped at the moment.

So, we’re at a kind of a weird place now. I just need to get this leak sorted then do the carb settings. Then the bike is on the road. But I’ve also just got Covid. Fortunately, I’m not too ill (mainly fatigue and breathlessness) as I’ve had both jabs but work on the bike has stopped. Realistically I need someone in the know to come and look at this leak for me before I can progress. And help me with the carb. I’ve reached the end of what I can learn by myself and need someone to teach me.

bsa c15

The restoration has been a journey. So many things – I’ve learned a stunning amount and done something I never thought I would be capable of, spent more on the bike than it’s actually worth (without having to even buy it), found great craftspeople who I would highly recommend, received great advice and even written articles about it. But the two most important things? I’ve made new friends (especially Dave and Lisa Smith, to whom I owe a big thank you) and I’ve had fun.

Getting supplies has been interesting. In our emails something Dave said brought home the dangers of buying modern pattern parts. To quote: “The original thread on the kickstart cotter is 9/32″ 26tpi cycle thread. Modern replacements are often 1/4″ or even 6mm!! Horrors. As producing that size is easier and cheaper.” So, you really need to be careful and buy from somewhere with a good reputation for supplying quality parts that are fit for purpose. At least a couple of hundred pounds has been spent on parts that didn’t fit. Again, to quote Dave: “the old boys in the past actually knew what they were doing and made decisions based on good engineering principles.” I would agree – except when it comes to chainguards and distributor clamps that is!

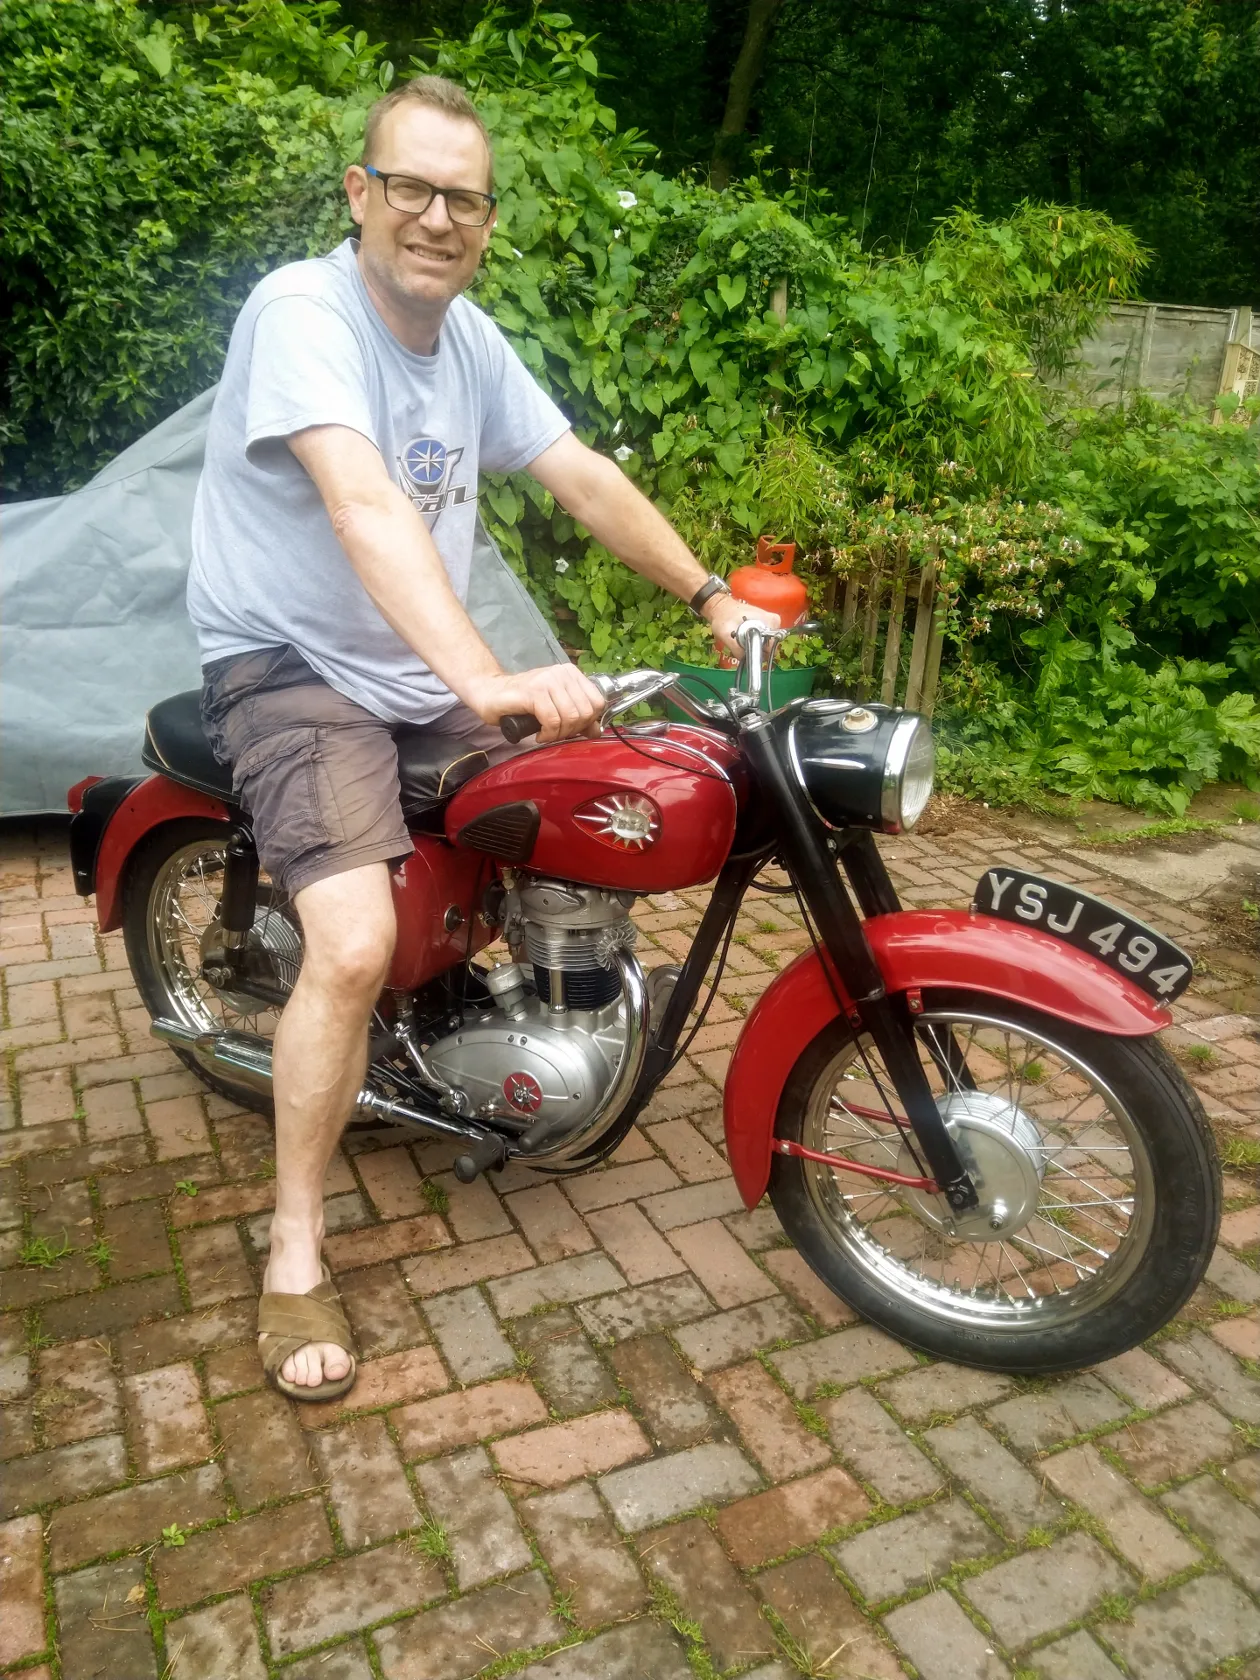
The bike isn’t roadworthy, but it runs, and I can keep the engine going. I could take it out tomorrow, but I wouldn’t get far at all, it would probably cause damage to the engine and it wouldn’t be safe – so that’s a no. I won’t have enough to write another article. All another article would say is that the leak is fixed, the carb is sorted and it’s on the road. There will always be other problems that need sorting as well, after all it’s a vintage motorbike! So, I’ll leave it here with a promise that I’ll send Salli a picture of me on the bike on the road as soon as I can. Thank you all for reading my ramblings, I hope you’ve enjoyed reading about it as much as I have enjoyed writing it. Stay shiny side up.

Jon Case

First published in Slipstream September 2021

Confessions of a First Time Restorer – Part 6

Part Six – It’s Starting to look like a Motorbike!

Last we spoke the bike was slowly starting to come together. So how much would I get done this month? Loads! Partly down to taking a week’s holiday, but also due to the prep and planning I had in place. However, you may remember from last month that there was an elephant in the room. So – first of all……

The gearbox. Oh Gawd. It was time to man up and get it done. My excuses had finally run out. I was convinced that it wasn’t right, and in the end I was correct. I did lots of reading, got advice and finally went for it. I took it apart and started again. Nope, it still didn’t work. Repeat a couple of times and it was sorted, so I sealed it all up. And then there was nothing again. Argh. It took me three days (with initial research, emails, cleaning, exasperation breaks, etc. etc.), but it was time well spent and quite an education. It ended up with all the individual components being laid out and closely examined for defects. They appeared to be in good order, hence it was down to my assembly.

Well at least I knew who the problem was! I started yet again, having been given a specific order in which to assemble. The partially completed whole was working correctly as each individual part was installed. I was being more methodical and taking more time with my assembly, testing the mechanism after each component went in. The final piece went in and it all seemed good. I was now convinced it was assembled correctly, but it still didn’t change gear smoothly. Then a final bit of advice from Mr R did the trick – rotating the mainshaft as I moved the gear change lever. This facilitated the inner workings moving into place. Blindingly obvious when you think about it! When you change gear the engine is running, things are moving and allow the gears to slip into place easily. I was trying to do this without the engine running.

bsa c15 engine in frame
Engine in frame
bsa c15 wiring loom
Wiring loom in place
bsa c15 headlight shroud and dash
Headlight shroud and dash complete
bsa c15 welded mudguard
Welded rear mudguard

This was a milestone as I could now get the engine back into the frame….and it was loose. Eh? I’d had to engage in a serious battle of wills to get that thing out of the frame and now it was loose? Ah, that was what those random washers were that I’d found on the floor when initially removing the engine. Carefully photographed, labelled and stored as ‘unknown washers – engine area’ (I knew that system would pay off). They shimmed the engine in perfectly. Now it was a lovely snug fit with no movement at all.

You may remember from my second article I talked about the wonders of Small Heath design and the way in which the chain and chainguard were assembled. i.e., having to get your hands under the chainguard to remove the chain before you could remove the chainguard itself. Very awkward and fiddly – perfectly designed to increase the creativity of your vocabulary.

Well, this daft way round of doing things also applies when reassembling, only it’s ten times more awkward, especially when trying to feed a chain over various sprockets whilst they are covered by the chainguard. I mean – why put the chainguard on before the chain? I eventually got it done, but not without having to loosen the rear wheel, do some serious fiddling around, lie on the ground with my head under the bike for a while, cut myself numerous times and maddeningly, scratch a newly chromed part. Fortunately, the scratch is not too obvious, but still, it is infuriating.

This done, I went back to the engine and the drive side. I was hoping that the drive side would be simpler that the timing side and so it was, but it did need new parts ordering. The clutch plates were worn and needed replacing. I also needed new roller bearings and cush drive rubbers for the clutch hub amongst other bits and pieces.

These were all ordered and the wait allowed me to do some planning for the piston. I knew absolutely nothing about pistons, apart from the fact that they go up and down. All this talk of compression ratios, bores, standard and oversize pistons, etc. was well over my head. Again, I had to research and ask questions, read and watch videos. Exchange emails with Mr Ratio, who gave lots of great advice and sold me some original piston rings to replace my broken pattern parts. Feeler gauges and a glaze busting tool were also ordered – my poor bank balance!

Whilst I waited for these to arrive the clutch parts were delivered, so I re-assembled the clutch and alternator. It was then pointed out to me that the primary chain was too loose a fit. Yes, I suppose it was. Dagnamit! Take the clutch and alternator apart again and more parts were ordered. Fortunately this was during my week’s holiday so I wasn’t losing any time. I was waiting for piston and drive side parts and had nothing I could do on the engine. So only one thing for it – the wiring!

This was something else I had been absolutely dreading. Electronics is a dark art and in my humble opinion, anybody who understands it studied under Snape at Hogwarts. This fear did lead me to being well prepared and planning what to do in advance though. I sourced more than one wiring diagram and, most importantly, went very slowly over two days. I will say that it is wired as per the wiring diagrams. Whether it will work or not is a totally different matter. I haven’t got a clue what any of it means – a green and yellow wire is attached to one of the terminals on the rectifier, etc. That’s all I know. Time will tell as and when I buy a battery and put some juice through the system. Doing the wiring did mean that I could get the headlight finished off though and that’s always nice visually.

I was also able to collect the welded mudguards. They looked a lot better and were soon taken back to Mike at Triple C. Understandably though I had lost my place in his job queue. Having to get the extra work done on these parts meant Mike moved on with his next jobs. Therefore, I will have to wait until he can fit me in again. Frustrating, but it would be unreasonable to expect him to just wait for me.

Whilst finishing the wiring the primary chain arrived, so I was now able to re-re-assemble the clutch and stator. Okay, maybe the old primary chain was too loose. I connected the clutch cable up and the clutch worked – remarkable. Stator wiring was soldered in place. Goo and gasket on, and the drive side was finished. I must add that any future owner of this bike who opens the drive side and looks at my soldering on the stator will wonder what muppet worked on the bike previously. Let’s just say that I’m not very good at soldering!

bsa c15 engine drive side
Whole engine – drive side
bsa c15 tax disc
Tax disc

The piston rings and glazing tool had also arrived, so I went onto the barrel and piston. I had also needed a new gudgeon pin and circlips.  The rings went on smoothly, as did the assembly of the piston, gudgeon pin and conrod. Then it was time to anneal the copper gasket and put the barrel on. Annealing – this was something else I hadn’t done. Videos showed that it should be fairly easy, but I didn’t have the necessary heating equipment. After previous disclosures in this fine publication, I was banned from the kitchen under threat of actual bodily harm and maybe even the silent treatment. I fluttered my eyelids but that failed miserably. So it was time to improvise again and out came the camping stove! Fortunately it worked nicely, and it was as easy as hoped.

With the piston in and the barrel on, it was time to finish off the timing side by putting on the kickstart and gear change levers. Now the timing side, drive side and barrel were finished and I could see if the engine turned over. And joy of joys, it did! The rear wheel went round, the gears changed and the piston went up and down. This building a motorbike lark might actually work!

Now I could move on to the final part of the engine – the head which included the valves, valve springs and the part I had questioned the existence of in part 1, the rocker box. The valves themselves were black with carbon, but a good soak in petrol and some gentle persuasion gradually removed it all and they were okay. They fitted nicely in the valve guides, (which was a mighty relief), as needing to redo these would have been a major issue for me. I did need some new springs, as the old ones were too compressed, but everything else was in good order.  Dave, of Rupert Ratio fame, supplied me with some NOS (New Old Stock) springs, still in their 50-odd year-old grease. He also suggested that I grind in the valves regardless so that I was confident of a good seal. This needed a new tool, which always holds a bit of excitement. Then I discovered that this expensive piece of equipment was actually a rubber sucker on the end of a stick. Phew!

So, the valves were ground in and fitted, along with the springs and the rest of the cylinder head parts. The rockers were taken out of the rocker box to be cleaned and once they were put back in the two parts could be put together and inserted into the frame with the rest of the engine. The engine block was complete.

The final thing I managed to do this month was a nice bit of bling. The bike had an empty tax disc holder, but obviously tax discs are a thing of the past. I found somewhere that can reproduce year accurate tax discs. So I got a tax disc for 1961, the year the bike was first sold and the issuing stamp to be Bradford. When I first bought the bike and gave the engine and frame numbers to the BSA Owners Club, they had told me that the bike was originally sent to a dealer in Bradford from the Small Heath factory. Although I did find out that the bike has probably been re-registered at some stage, as its registration number is an Isle of Bute number, these historically unused numbers are often used as age-related re-issues.

And that’s you up to date. I’m going to leave it open as to whether I write anything next month. The fact is that I made so much progress on the engine this month that I only have the valve clearances, distributor and carburettor left to do engine-wise, which is not enough to fill an article. And I can’t really do any more on the frame until I have the tinware back and I don’t think that will be this month.

So, I’ll leave it open. If the tinware comes back earlier than I expect, I’ll be here next month. If not, I’ll see you in a couple of months. Keep safe.

Jon Case

First published in Slipstream June 2021

Confessions of a First Time Restorer – Part 5

Part Five – Two Steps Forward, One Step Back

If anyone ever tells you that restoring a classic motorbike is a rewarding experience, they are telling the truth. But what they are omitting is that it is also one of the most frustrating experiences known to humanity. Every time you make some progress, something else happens that makes you have to back track. This is even more true when you are learning as you go along because you lack certain basic skills and knowledge. I have taken to likening myself to a novice baking a cake!

However, what my cake recipe does not and simply cannot do is tell you how to perform the basic tasks. Or include a culinary dictionary. It would be 400 pages long if it did. It might say, ‘break 2 eggs into a bowl’ or ‘fold the ingredients together’. It does not tell you how to break those eggs, or how to ‘fold’. And how you break those eggs and stir the ingredients can make all the difference. The same goes for the ‘tablespoon’ amount, the quality and cocoa content of chocolate, etc, etc. The recipe must assume a basic level of knowledge, ability and quality of ingredient.

I have all the ingredients (the bike and its parts) and the recipe (Rupert Ratio and BSA Service Sheets). I really want a mouth-watering, moist, tasty cake at the end! But as well as learning how to do the complicated bits I’m having to learn how to break the eggs, sometimes by trial and error, sometimes by asking for help. I am lucky to have found the BSA C15 Facebook group, and in particular Dave and Lisa (Mr. and Mrs. Ratio) who are so utterly generous with their time and knowledge.

Completing individual tasks can also be further complicated by the issue of not knowing whether you have actually done it correctly. An experienced chef will know things are going well at all stages. Their experience and knowledge will tell them that. If it’s wrong, they can correct it then and there. The average novice (me) will not know that they have destroyed the mix and will carry on regardless, only to realise it is wrong when their cake looks and tastes like something you lost under a sofa cushion six months ago. There’s a lot of learning going on here. There are going to be teething problems at the end that need ironing out. I have no doubt that the second bike will be an easier process due to the amount I have learned from my work and mistakes on this first bike.

Restored shocks in place
Restored front forks in place
Complete rear wheel

Anyway, the month started with a bit of a road trip. The chrome was finally ready, so I combined collecting this with a trip to Dynotech in Bramley to let Andy have a look at the front tyre I had waved the white flag at. Basically, my compressor wasn’t powerful enough!  Andy removed the valve (useful tip, that) and blasted the air in a couple of times until the bead sat correctly. Sorted – cheers Andy. And a tip from a professional. Forget all the tyre soap and expensive tyre lubes – Fairy Liquid. Not supermarket own label, it has to be Fairy due to the lack of other nasty ingredients. Feeling all pleased with myself I then got home and realised I had left a couple of bits of chrome at AK Moto and had to go and collect those 2 weeks later.

This month was to be full of things that started getting the bike back together again. Now I had the chrome I could get on with my next goal of getting a rolling chassis. I assembled the shocks and posted Steve his tool back. I started to assemble the wheels and then realised I had ordered/had been sent the wrong size hub caps – fiddlesticks! The wrong hubs were returned and the correct ones ordered. In the meantime I assembled the forks which fought me every step of the way on a very physical and frustrating day, but I got there in the end. The correct hubs arrived and the wheels were assembled. Once I got the knack of getting in the brake shoes they went together very nicely.

One day, when I came out of work, a voicemail saying: ‘Got the parts back from the sandblasters. Would it be possible for you to pop in?’ Eek. This was from Mike at Triple C Paint. My wallet immediately came out in a cold sweat at the thought of this. I did ‘pop in’ to see Mike and it was going to hurt my wallet. Some schools of thought say that I shouldn’t have sandblasted the tinware, but I decided to on the premise that the aggressiveness of this method would show up any inherent weaknesses in the metal and it did exactly that. The broken stay mentioned last month showed that some of the tinware was not in the best of nick. Mike and I also knew that the rear mudguard had previously been repaired, but not very well. A crack across the centre of the mudguard had been bronzed and a plate riveted in rather than it being welded and repaired properly. General age-related corrosion also resulted in several other holes. There was minor stuff on the front mudguard (apart from the stay) and a couple of other parts needed attention. Fortunately, and most importantly for my wallet the oil tank and petrol tank were fine. The rear mudguard was not usable in its present state and would need to be repaired. The front mudguard stay would have to be repaired before it could be used as well. And I figured that I might as well get the other minor bits done also. Looking at a specialist business these repairs were heading on for £450. Ouch – not in the budget! I tried to source another rear mudguard instead, but these seem to be as rare as the proverbial rocking-horse droppings. I could not find an original one anywhere, even in America or India. So I’ve gone with my usual method and taken them to a local guy down the road – AIM Sheet Metal. Apart from supporting small local businesses, I find it is cheaper than a big company and the quality of the work often better. I prefer to send business the way of people whose work is their calling card. I’m looking forward to collecting these parts and getting them back to Mike.

So I was now able to crack on with getting a rolling chassis. Shocks, forks, wheels were all put on the frame. With wheels being on, I needed the bike to be able to stand up on its own, so the centre and side stands were added as well. My next goal of a rolling chassis had been achieved.

I could now get the engine back in the frame. This was an ideal stage to do this as the engine wasn’t too heavy or awkward, and once in the frame it would still allow me access to start work on the drive side and the top of the engine. However, I was reluctant and kept putting it off. This was because my gut was still telling me the gearbox wasn’t right. It was all assembled and sealed up, but I just felt that it wasn’t right. It felt rough and only 2 of the gears seemed to be engaging properly each and every time I tried. To be honest, I was avoiding dealing with this like the plague as I didn’t have a clue how to remedy it. I kept pushing it to the side and doing something else.

So, I ended up assembling other bits and bobs on the frame all the while putting off the inevitable. The handlebars went on, headlight shroud, battery box, foot pegs, rear brake pedal and brake mechanism were assembled (bit of a faff there – the placing of things needed tweaking as the nearside pillion footrest rubbed against the rear brake rod). I even ended up electrical testing and fitting the horn, rectifier and ignition coil as well. All to avoid dealing with the gearbox. Parts were ordered and received also. I received the decals and delivered them on to Mike. There is one decal I need to do myself as well. I’ve got the dreaded wiring loom. That alone will be an ‘adventure’. But that’s a little bit down the line. But the gears are still not sorted. I must get them done otherwise I am going to grind to a halt, both figuratively and literally!

Finally, there was a first that made me feel all pleased with myself. One day whilst flicking through the BSA C15 Facebook group someone asked a question about the number and orientation of the fork seals and the fork seal holders themselves. I knew the answer to that. I looked like a teenager using both hands speed typing on a phone for once, rather than a middle-aged bloke squinting at the screen and hitting it repeatedly with one finger. Boy, answering that question made me feel good. And then I hit the books and checked my messages from Mr and Mrs R to check that I had actually given the correct answer. Honestly, I hadn’t asked the same question myself 2 weeks earlier. I did sound all knowledgeable though, even if I say so myself. There was a definite strut to my step as I went to tell Sharon about this personal achievement!

Corroded rear mudguard
Rolling chassis

Jon Case

First published in Slipstream May 2021

Confessions of a First Time Restorer – Part 4

Part Four- Things Start to Come Together

Blimey, has another month gone already? Time flies when you’re having fun. I think I’ll go all Hollywood for the start of this month’s article. (- cue deep, manly voice) Previously on Confessions of a First Time Restorer – the speedo had been restored, the engine casings were being vapour blasted, the petrol tank was in to be treated, the wheels had been restored, a painter had been chosen, the frame had been powder coated, I had started some DIY painting on small bits, the chrome had gone in and most importantly, I had survived my heater confession.

The month got off to a good start as I collected the engine casings from RD Cox in Reading and the beautifully treated petrol tank from Jeep in Waterlooville. There had been a delay on the engine casings as one of Doug’s people was off work with Covid. Thankfully, they made a full recovery and I was able to collect the engine parts on the 2nd. Getting these back was key to progress. I couldn’t start on the frame as I needed the chrome back to be able to do that. The first parts required on the frame both had chrome components. With hindsight I should have got the chrome in earlier, but there we go. Getting the engine casings back did mean that I could start on the engine though. And they looked great. What a difference to before.

bsa c15 restored engine casings
Restored engine casings
bsa c15 battery holder pre repair
Battery holder pre repair
bsa c15 battery holder post repair
Battery holder post repair

Starting on the engine did worry me, and to be honest, this worry won’t go away until I can ride the bike without it grinding noisily to an expensive halt. I might think that I’ve done it correctly and I may think that all the various components are in good working order, but I don’t know for sure. I don’t have that knowledge or experience yet, although it is amazing the amount I have learned. Will it work? Time will tell. I have no doubt there will be teething problems, but that is to be expected. I continue to study the books, learn from videos, get great advice off people online, and Dave and Lisa (Rupert Ratio) are kind enough to help me out every time I ask for help. But advice can only be as good as the questions asked. Ask a question on Facebook and you are guaranteed to get at least three different answers. Am I asking the right questions and getting the right answers? I guess these are the normal doubts of someone who is trying something for the first time so outside their skillset.

A great, and massively frustrating (embarrassing?) example of this has been my nemesis of the month, the tubes and tyres. I thought this would be simple. I’d been putting tubes and tyres on bicycles since I was a kid. I’d also watched some YouTube videos just to be sure. How hard could it be? The answer? Very when your name is Jon Case. On my first attempt I put the tubes and tyres on and eagerly pumped them up. Nothing! No air appeared to be going in. Eh? Valve faults, pump faults, twists in the tube. All investigated and discounted. I took everything apart and realised that I had managed to puncture both tubes putting them on. Not small holes either. Plonker! So new tubes were ordered. Take 2, being a lot more careful this time I tried again. I even wore gloves. Both appeared to have been a success, until the next morning when the front was flat again. Somehow I had managed to puncture the front tube again. I probably pinched the tube with the tyre spoons. This time the hole was much smaller though, so I decided to use a puncture repair kit until I was happy I could do it properly. I would then put in a new tube. Take 3, on it went again and it stayed up this time. However I did notice that the bead was not sitting evenly around the rim. More investigation. Takes 4, 5, 6 etc, etc, over inflation, tyre soap, silicon lubricant, bouncing. Letting it down and re-inflating repeatedly. All done to no effect. Meditation to stop throwing a complete tantrum, perfected. I have now inserted a new tube and am going to take it down to Andy at Dynotech in Bramley for some help. The white flag has well and truly been waved on this. I’m assembling an engine but can’t put a tyre tube in! As I said, embarrassing.

Back to the engine though.  An important part of the process was cleaning out the sludge trap. This removed all old particles of muck and debris that had accumulated in the depths of the engine. You may also remember that I got a new crank sleeve – (from Austria of all places)? I had to get this fitted before I could put the crankcase halves together.  This was a loose fit, whereas I had to battle to remove the original it was so tight. So, on advice from Mr. R I used Loctite to fix it in place. I could then put the crankcase halves together but trying this highlighted another issue that I had not considered. The bush that this sleeve went into was now too small for the new sleeve. Upon investigation I discovered that this meant I needed to do some ‘reaming’. I’d read that word lots of times but didn’t have a clue what it meant. For those with my level of knowledge it means increasing the internal diameter of an object so that another object will fit into it snugly. For engines, the objects going into the bush need to be an exact and very snug fit so that rotation within the bush can occur but there is no unwanted lateral movement.

Now this needed equipment that I did not have access to (I have found some proper tools since) lateral thinking time again. I came up with a method that I think will work. Again, time will tell. If I’m wrong it’s going mean a lot more work. Basically, I horizontally secured my drill in place and used an abrasive attachment on the drill to carefully increase the internal diameter of the bushes. I did this very slowly, one circuit of the bush at a time so not to go wrong. I then polished the bronze so it was smooth. They fit snugly, rotate very nicely and there is no give in them. Back to that worry part. I think it is okay, but don’t know for sure yet. There are potentially many people out there shaking their heads in disgust.

Doing this reaming allowed me to put the crankcase halves together and start work on the timing side of the engine. I have previously mentioned that the distributor drive shaft and drive pinion both had teeth missing. I now believe this was because the drive shaft bush had not been inserted correctly allowing the shaft to move up and down instead of staying vertically in position and resultantly break against the pinion. I needed new of both. They also needed to be a matched pair. I found the shaft in the Netherlands but couldn’t find the pinion anywhere. As for a matched pair, nothing! I also came up with two part numbers for the shaft. Mr R to the rescue again. He told me that upgraded shafts and pinions had been introduced in 1960 because of excessive wear and tear, hence the two part numbers old and new. He also said that he had a matched pair he could sell me. Result! Ordered and installed. Then came the oil pump, sump plate and the trickiness of the gears, camplate and quadrant, etc. I think I have put the gears in as per the books and schematics, but my gut tells me they are not quite right yet. I’m hoping Jim Bates will be able to come over next month as we start to exit lockdown. I’m going to ruthlessly use his knowledge and see what he thinks. It may well involve some disassembly but so be it.

bsa c15 restored timing side
Restored timing side

The next part was the engine casings which needed to be vapour blasted. Recommendations on BSA Facebook groups led me to RD Cox in Reading. For the petrol and oil tanks, Andy Kennett at Dynotech in Bramley (where I take my Yamaha), recommended a gentleman called Jeep in Waterlooville. Only the petrol tank needed work, the oil tank is fine – some money saved! The shiny bits have gone off to AK Moto in Goring – more on that in a sec. Small privately-owned businesses whose work is their calling card and their future business, apart from Jeep, who I assume does it as a hobby during his retirement. I am eagerly anticipating the return of all these items as I will then be able to start re-assembly.

I had another ‘spreadsheet’ moment when it came to the chrome parts. I was quite shocked when I got the quote through. It was significantly more than I expected. Some parts were excellent value, others way more than I thought. It was actually cheaper to buy new for several parts. This was disappointing as it would have been nice to use the original parts, but sense had to prevail – first time for everything.

You’ll note from the background of the photo that I have gained an assistant, Murphy one of our dogs. He has taken to lying outside the shed keeping me company. Nothing to do with the supply of dog treats I have in the shed. I get regular nudges reminding me it is time for his next treat. Usually at a particularly trick moment of course.

The other things that have been completed this month are my painting of parts that I could not get powder coated. I did numerous layers of primer and plenty of coats of black. They have come out looking lovely. I have also repaired the battery holder which had an arm missing. It would have been nice to have welded another arm on, but, once again I do not have access to that type of equipment and improvised. I did coat and spray the parts I used, so I am pleased with the result.

So the timing side was in place and it was time to get the outer timing cover on. Gasket goo done and cover on. When I first started reassembling I had decided to print out copies of the schematics so that I could tick off each part as it went back in or on. There were various reasons for doing this. Not only did it mean that I was assembling in the correct order, but it also meant I could ensure I used all parts I had taken off. And alert me to missing parts. The only problem being when the piece you’re scratching your head over is on a different schematic to the one you would expect and is meant to be on the other side of the cover you’ve just gooed into place! Darn. Cover off, goo cleaned off, part inserted, goo reapplied and cover reinstalled. Annoying, but it immediately proved the worth of the system.

This was as far as I wanted to go on the engine without it being in the frame. As mentioned, I couldn’t put the engine back in the frame until I had a rolling chassis (due to bits of the engine protruding outside of the frame). And I couldn’t have a rolling chassis until I got the chrome back. I am stuck until I get the chrome back, which is not only taking longer than I anticipated it has also had an additional delay.

Only one more thing I could potentially do this month. As I had the petrol tank back from Jeep, I could get the tinware to Mike at Triple C if he was ready for it. He was, so it has gone in.  There will be some additional work to the front mudguard though, as when I picked it up (correctly, I hasten to add) to take it in one of the stays just snapped off. I was quite annoyed until I realised that this was probably the ideal time for this to happen if it had to.

So on the last weekend in February I ground to a halt. I still couldn’t start on the frame and I didn’t want to do any more to the engine. I was assured that I would be able to collect the chrome a week and a half later. We’ll see.

To that end I’m signing off until the next instalment. I have plenty of non-motorbike things that need catching up on now lockdown measures are going to be easing. I will try to get some bike stuff done but can’t guarantee it.

I hope you are getting your jab dates through. Maybe we’ll have a St. Crispin’s Sunday before too long?

Jon Case

First published in Slipstream April 2021

Confessions of a First Time Restorer – Part 3

Part Three – The Expensive Bit

First things first – I’m still here to carry on. I was in the room when my wife read last month’s article and it was hilarious when she suddenly stopped reading, walked directly to the conservatory, immediately came back and said, ‘You’ve got my heater, you git’! I was laughing for at least a couple of hours. She then gave me ‘the look’ when she got to the part about the oven. One hundred lines – ‘I must act like a mature adult’.

When I signed off last, I’d completed the stripdown and I needed to get restoration work done before I could start reassembly. Lots needed doing – January was going to be expensive. Therefore, the rest of this article could just be two words long, but I’m hoping you’d want more information than that. Those two words? BUDGET SMUDGET.

I’d given myself a ‘finger in the air’ budget of £2k. To be fair to myself the £2k was a total guess based on zero knowledge, so I’m not surprised that it was wrong. I now think about £3k..ish. This is more than the actual value of the bike. But, as it is in memory of Peter, my Father-in-Law, I don’t really mind. When it comes to the second bike I’m going to see how good I can get it for as little as possible. I will be able to get costs down with new skills that I have learned.

bsa c15 speedo
Smiths magnetic speedo
bas c15 bottom yoke
Powder coated bottom yoke

Before going any further though I should mention something I forgot to note when I started stripping down the bike in November. I wear glasses. I have been short-sighted since I was a kid up North. But now I’m becoming the ‘old git’ that my kids have always called me. I don’t need reading glasses (yet); however I do need to take off my ‘seeing’ glasses to look at things closely. So when working on the bike, I frequently take off my glasses so that I can see what I am doing. At first I’d pop them on the ground next to me whilst I did that bit of work. I’m sure everyone can guess what’s coming. Yup, one day, I’m working on the bike and take off my glasses and put them down on the ground. I then realise that the spanner I’ve got is the wrong size and get up to change spanner. Crunch! I stood on my glasses. Numerous swear words were spoken with great feeling. I had not broken a pair of glasses since I was at school over 30 years before. Fortunately, I had a spare pair so was able to carry on – until the next day when I did exactly the same thing with my spare pair! The swear words had great volume as well as great feeling this time. To use a good Northern word meaning a stupid person (also, really satisfying – just try it) that my Mother and wife regularly take great pleasure in using about me – what a wazzock! Glasses weren’t part of my budget.

Anyway, back to January. Due to Covid we had gone on to a rota system at work, so I didn’t need to be there all the time. This gave me loads of bike time. The first thing I needed to do was to get on the computer. I didn’t know where to get things restored. The BSA and TVAM Facebook pages yielded recommendations for most things, so it was just a matter of researching them and choosing one of each.

Firstly, I settled on Classic Speedometers in Mansfield to do a full service on the speedo. Not many people in the country work on Smith’s magnetic speedos and I have to say that Stuart did a wonderful job. It looks fantastic. A true craftsman.

Next, I wanted to look at the frame and tinware paint. The consensus was that this should be ‘two pack’ for greater originality. Ideally, I wanted to keep the original paintwork and having it restored rather than have everything repainted, even if some imperfections were noticeable. I had narrowed down my selection to two firms and decided to go and visit them. However, times being as they are, I wanted to be sure that this was allowed and that we could keep it safe. Government websites confirmed that visiting these businesses was legal. As these businesses could be open, customers may visit. Due to the specialised nature of these businesses, it also meant I could travel to visit them. Both also confirmed that these would be socially distanced meetings outside.

The first visit was an eye opener in a couple of respects. One – it wasn’t the original paintwork. It was the same colour, but a not-very-good-quality repaint. No point, nor a good idea, in keeping this paint. Two – two pack was flaming expensive. The quote from the first place was over £3k just for the frame and tinware. I knew from their website that this place was going to be expensive but £3k was a non-starter. That wasn’t happening. I felt disappointed about the paint not being original, however it did mean that I didn’t need to two pack and could consider methods that are modern and less expensive yet also yield great results. It also meant I could powder coat the frame and other relevant parts which was a lot cheaper.

The second person I visited was Mike at Triple C Paintwork in Burghfield. I had been recommended Mike by a couple of people in different Facebook groups (and have also since found out that he advertised in Slipstream last year). It was one of those situations where you just feel it is right. Mike was open and engaging, answering all my questions (even the dopey ones) without any hint of an agenda. He showed me examples of his work at various stages and explained my options, both traditional and modern. I came away feeling Mike wasn’t doing a hard sell, he wanted what was best for me and my bike. I decided to go with Triple C using modern methods at a much more reasonable rate. The only negatives were that it would be March before the work could be done and they don’t powder coat. However, I could see the positives in the wait. His work must be good to have to wait that long and these parts of the bike would be the last to go back on. Regarding powder coating – Mike recommended Tadley Powder Coaters. I called in on them the next day and they took most of the parts there and then. They couldn’t take the shock absorbers as I had not been able to take the chrome collets off, nor the footrests as the rubbers were still on. A week later I had the frame and parts back. They looked lovely. It was starting to get very real!

The next part was the engine casings which needed to be vapour blasted. Recommendations on BSA Facebook groups led me to RD Cox in Reading. For the petrol and oil tanks, Andy Kennett at Dynotech in Bramley (where I take my Yamaha), recommended a gentleman called Jeep in Waterlooville. Only the petrol tank needed work, the oil tank is fine – some money saved! The shiny bits have gone off to AK Moto in Goring – more on that in a sec. Small privately-owned businesses whose work is their calling card and their future business, apart from Jeep, who I assume does it as a hobby during his retirement. I am eagerly anticipating the return of all these items as I will then be able to start re-assembly.

I had another ‘spreadsheet’ moment when it came to the chrome parts. I was quite shocked when I got the quote through. It was significantly more than I expected. Some parts were excellent value, others way more than I thought. It was actually cheaper to buy new for several parts. This was disappointing as it would have been nice to use the original parts, but sense had to prevail – first time for everything.

bsa c15 rear wheel
Restored rear wheel

The other parts that needed looking at were the wheels. These needed a decent amount of work. I especially wanted rid of that horrible red paint on the rim that someone had used a paintbrush to throw on. I settled on Mike at Salisbury Wheel Builders. You may remember that I had broken off a bit of the rear wheel hub when I managed to get my left and right mixed up. This did turn out to cost, but fortunately not as much as first feared. Mike took one look at the rear wheel and said I needed a new hub. I managed to source an original one on Ebay and had it delivered direct to Mike. The hubs were cleaned and painted, new rims and spokes and one week later, what a result. Tyres and tubes have been ordered.

So that was all the bits in and some back. However, I could not start any re-assembly yet. I needed the engine casings back to start anything on the engine and I needed the chromed parts to be able to start putting anything of significance back on the frame or wheels. But I did have other things that needed doing. I took apart the carb and put all its bits through the ultrasonic cleaner. They have come up looking fantastic and as spotlessly clean as I believe they need to be. The forks needed properly taking apart. I’d had trouble separating the oil seal holders – a soak in petrol and the club hammer sorted that.

I was also watching a series of programmes on YouTube by a guy called Michael Waller from Britannia Motorcycles. A Yorkshireman based in upstate New York, he was restoring a C15. These programmes are great for me as I can actually see things being done. I can heartily recommend this guy to anyone interested in British bike restoration. He has made videos of many bikes and not only is he very informative but he is thoroughly entertaining. His videos, in conjunction with the Rupert Ratio books are fantastic resources for a newbie like me.

Then there were the bits that I couldn’t leave at the powder coaters as they weren’t fully taken apart, the shocks and the footrests. The shocks had chrome collets holding the spring in place and a special BSA tool was required to remove them. Of course, this tool was not to be found anywhere and is no longer manufactured. I needed the collets off to get them re-chromed and the shocks powder coated. Fortunately the beauty and generosity of those on the Facebook BSA C15 Restoration Group came to the rescue. A guy called Steve had made this tool himself and offered to loan it to me…… without knowing me from Adam – how cool is that? Steve posted it to me and off came the collets just like that. As soon as I get the re-chromed collets back I will get the shocks put back together and post it back to him. Thanks Steve.

So the collets were off the shocks, the rubbers removed from the footrests and these parts needed re-painting. I considered taking them to Tadley Powder Coaters, but as there were only seven bits I decided to try re-painting them myself. Earlier I had bought a can of chrome spray to ‘chrome’ bare metal parts, but to be frank, this looked pants. I bought some new attachments for my drill so I could polish up bare metal parts, even screw heads and washers (OCD, I greet you!). I could also remove old paint back to metal, hence me getting the idea to re-paint myself. I have primed and coated all these parts, and in my personal opinion they look fantastic. The light fixture in the lounge came in really handy.

I think this looks great but my wife wasn’t overly pleased with this, especially when my son started re-spraying his car grille in the conservatory at the same time. That solvent smell wafted through the whole house.

Towards the end of the month I needed to address the crank sleeve that Jim Bates had pointed out to me in December. This was firmly (as it is meant to be) stuck in place. As usual a special BSA tool that is no longer available was required to remove it. Advice varied from cutting it off, drilling holes and inserting bolts into it to pull it off or sending it to be removed by Mr Ratio himself. I ended up adapting a sealant gun with Allen keys attached to move it a bit, then got tyre spoons under it to move it a bit more, until I could get a gear puller under it. Off it came. True lateral thinking. And then I could only source the replacement from a British bike specialist in Austria.

Finally, there was a very exciting moment in the month – ‘First Assembly’. I had all the parts needed to do my first bit of assembly – the steering head and fork trousers. They all went on a treat and were promptly removed due to the chrome spray mentioned above looking rubbish. Chrome spray removed, metal polished, re-re-assembled and it looks great. A REALLY satisfying moment – look at that shiny finish!

So, where are we now? Waiting. Waiting for engine casings, chrome, petrol tank and March for re-painting. There’s going to be stuff to do in February, although I don’t think there will be that much to report as I’m back at work full time as well. We’ll see though and I’ll let you know. In the meantime, stay healthy and safe. Roll on the vaccination programme and good weather.

bsa c15 crank sleeve removal

Jon Case

First published in Slipstream March2021

Confessions of a First Time Restorer – Part 2

Part Two – The Stripdown

So, where did we leave it last month? Oh yes, me standing in front of two 1960s BSA C15 Stars in the back garden and thinking ‘Oh, Good God. What have I done?’ I had the outlines of a basic plan of attack in my mind. For starters I was going to do one bike at a time, the red 1961 bike being the first victim. Surely that being the older bike, it would be the simpler bike? I still don’t know on that one, I’ll let you know in a year or so after I’ve tackled both.

I had been planning in advance though, and even before the bikes arrived, I did know several things for sure – I had bought and built my Mancave, I needed to be methodical and meticulous, I needed new tools, I needed a subscription to Amazon Prime for the tool deliveries, I needed good reference and information sources, and I needed good people for good advice.

Some of these had already been put in place. Whitman tools – bought. Amazon Prime – subscribed. BSA Owners Club membership – sorted. BSA C15 Restoration Group on Facebook – joined. Space for computer and Wi-Fi in Mancave – done. Raiding of my wife’s old crafting storage for empty containers – check.

BSA C15
BSA 15 Star
BSA C15 Cylinder Head, Rockerbox and Carburettor
Cylinder Head, Rockerbox and Carburettor
BSA C15 Front Wheel
Front Wheel
BSA C15 Inner Gearbox
Inner Gearbox

I had been recommended some BSA reference books called the ‘Rupert Ratio Unit Single Manual’, volumes 1 (the Engine) and 2 (Everything but the Engine). Unit single denoting the BSA models that had the engine and gearbox in one single ’unit’, and they were ‘single’ cylinder. The Rupert Ratio books had been recommended to the extent that buying these was a no-brainer – without exaggeration, everyone told me to get them (I have since noticed them in the background of YouTube videos about C15 restoration as well). Therefore, they were ordered, and I duly received both books, signed by the author no less! These two books (there is a 3rd volume which covers the lesser-known models) look at the BSA unit singles in great detail and make the task of working on the bikes a lot easier. Well, they actually make it possible to do anything at all for someone with my level of knowledge. What I also found out later is that ‘Rupert’ and his wife are members of the C15 Facebook group and join in many a discussion. I’ve bought a centre stand off them as my bike didn’t have one and I couldn’t source one anywhere at all. I was contacted by them to say they had one. ‘Rupert’ (a.k.a. Dave) and his wife, Lisa, are very generous with their advice and knowledge. If you do any work on a C15, you need these books.

Talking of knowledge – what on earth were all these bits and pieces that were going to come off the bike called? Easily sorted. A Google search later provided schematics for all sections of the engine and frame were printed off and laminated. These schematics are labelled with the original BSA part numbers, and I put these numbers and their relevant descriptions on the back of each sheet – very useful. Now covered in oil and grease, hence the laminating.

But how would I remember where each bit was from after it came off the bike? This is where I went a bit OCD. When I was a teenager in the 80s (you know, the last decade of decent music, and the decade responsible for my love of cruisers) my Dad got an Armstrong Siddeley Star Sapphire which he did up. He had a lot of knowledge about cars and engines, but he still took some photos to aid him when it came to reassembly. Not many though – they had to go to Boots to be printed. Other people had also said to take photos. I decided that I needed a cataloguing system. Therefore, each part that came off the bike was photographed and given its own unique code. Lots of parts were also photographed in situ to aid reassembly. This code and the part description were duly entered into a ledger (it’s going to be on a spreadsheet for the second bike). The camera’s photo file name was manually changed to the code and description (hence I can now search the photos by part name and code). Each part was then put in its own bag and the part code written on the bag. A bit of a faff, and definitely time consuming, but I know that I will be very glad of it when it comes to reassembly. I know where each part is and have a photo and description of it. So far, I have over 750 photos! Thank goodness for digital photography.

As an aside I have just realised that maybe some theme is going on here – my Dad had an Armstrong Siddeley Star Sapphire. My day-to-day bike is a Yamaha XVS950 Midnight Star. And these two bikes I have inherited off Sharon’s Dad are BSA C15 Stars!

Anyway, it had occurred to me that as I was going to be doing this properly, I needed some new toys. Shame! Out came the bank card and I hit the internet. Parts washer, ultrasonic cleaner, tap and die set, gear pullers, tyre levers, valve spring compressor, torque wrench. All needed and bought. Along with other speciality BSA tools. These were not all bought before I started. Some were ordered as I went along and realised that I needed them. That Amazon Prime next day service has really paid for itself.

I felt I was as prepared as I could be, so I set to it. On day one I just tackled easy bits of bodywork to settle in. Petrol tank, mudguards, oil tank, seat. It was an easy start and got me going.

Things got more difficult though, not only with things that I couldn’t work out how to do (that bloody engine just wouldn’t budge out of the frame), but also with the joys of BSA design – I mean, who really thought that having to take off the chain before you can take off the chainguard was a good idea?

So, the frame was now stripped and ready to be painted. However, when it came to the engine that was a different matter, my DIY knowledge had a reduced impact. I’ll come to that shortly but, firstly, there were more important issues.

I had been working on the patio as the weather was mild, but I soon had to move into the Mancave due to the rain and then because of the cold. And it did get cold – too cold. How could I continue if I couldn’t feel my hands? I had to think outside the box. There was no way in hell I was going to be allowed to bring the bike inside and work on it there. I would have been instructed to ‘remove myself from the premises with immediate effect’!

Therefore, an intricately planned, and painstakingly executed, military style operation was carried out. In other words, whilst my wife was out, I nicked the heater from the conservatory. At the time of writing, it is 6 weeks and counting that I have got away with this. I guess this being published will tell how closely Sharon does read my ramblings! My progress may be about to slow considerably due to the injuries I’m going to sustain.

But I am, at present, able to work in a nice warm Mancave. Please also note in the photo above, on the floor next to the heater, that most vital piece of equipment when dealing with a vintage motorbike – the club hammer! And yes, the toolbox is fine on top of the heater. The heater is designed to allow things to be put on it. I can see people shaking their heads in disgust.

Anyway, back to the engine. In the end I was very pleased with how the engine came apart. I learned a huge amount. There was the odd time that I had to resort to the blowtorch I’d nicked from the kitchen (oh Gawd, now I’m in more trouble) and rubber mallet but in general it came apart well. Again, things were very dirty though. I am glad that I have taken it apart.  There were several things in the depths of the engine that will need attending to. A previous owner had filled up an internal gap with red hematite. This hematite fell out of the gap when I reached that area of the engine. I thought that the casing was falling apart, so asked advice only to be told that the gap was meant to be there to allow oil to move around. That was a relief but made me wary that a previous owner may have had a similar level of knowledge to me and done some things wrong. Several components will need replacing. The distributor drive shaft and the distributor drive pinion both have teeth missing from them (that may sound all knowledgeable, but I had to look up their names to write this!). Coincidentally these are right next to the hole that was filled in. Other parts such as bushes, springs and bearings will need replacing as a matter of course.

Another carefully planned sneak attack also had to be enacted. When it came to removing the aforementioned bushes and bearings the advice I received was unanimous – put the casings in the oven at 150 degrees. Really? Did people actually want me to live through this? Regardless, one day, when my kind, beautiful and adorable, better half (she might get this far in the article) was out, several engine casings went into the oven. And out came the bushes and bearings exactly as they were meant to – success!! Along with copious amounts of very smelly oily smoke. My survival was in the balance here. Kitchen door shut, extractor fan on, windows open, all Gods prayed to. Fortunately, the smell was 90% gone by the time Sharon got home, but my speciality hangdog look and some shameless emotional bribery of ‘well, it was for your Dad’s bike’ had to be employed. I made it – just! Tip – make sure you have the parts thoroughly wrapped in foil when they go in the oven. It takes longer to heat them through but keeps all noxious odours out of the kitchen.

I am always aware that I still have a lot to learn. Jim Bates came over one day in between lockdowns for an outside, socially distanced check up on my progress. I proudly showed him my work. On the desk were the flywheels. ‘Those will need replacing’ says he pointing at the crank sleeves (had to look that one up too). ‘Eh? What?’ says I. And the same with some bearings. Oh bugger. A good lesson though. I really need to check these engine components properly before they go back in. Fortunately, the Rupert Ratio books, and the internet, are gold mines of information, and I know that many very helpful people are just a post away.

So, the bike is now all apart and it’s time to move on to Stage 2 – cleaning and restoration.  Which makes it time to sign off for this month. The many bits and pieces need a really good clean, they’re filthy. The parts washer and ultrasonic cleaner are going to be well used. The frame is going away to be painted. The tinware needs to go somewhere for the paint to be restored, or redone if necessary. I don’t know which yet. The shiny bits need doing. The wheels need rebuilding (the rear potentially needing a new hub thanks to my mistake). The petrol tank and oil tanks need to have their internals checked over. So, whilst I might not be in the shed as much, I’ve still got plenty to be doing. This, I will update you on next month.

In the meantime, keep healthy and stay safe out there, both on and off road.

Jon Case

First published in Slipstream February 2021

BSA C15 Stage 1 Complete
Stage 1 Complete
Jon Case

Confessions of a First Time Restorer – Part 1

Part One – How it all Began

Firstly, let’s get the introductions out of the way. My name is Jon Case and I’ve been riding for just over 3 years, and a member of TVAM for 2 years. A few years ago I reached that mid-life crisis moment. I’d had enough of the career lark, the kids were in their teens, my wife had her hobbies, and I had some personal issues that were in the process of being sorted. To that end, and thankfully with the support of my family, I packed the career in and decided to start again. I handed back the company car, gave up the sales job and went working stacking shelves in a supermarket. This turned out to be the best thing I had ever done career wise. I re-discovered happiness.

A few months into this I found myself thinking about motorbikes one day. I’d always wanted to ride a motorbike but had never learned. My father had been a surgeon in the era when helmets were not compulsory and protective gear was not a priority. He was very anti-bikes due to the number, variety and seriousness of the bike injuries he saw. So there was no chance of me being allowed to learn to ride, and then I never got round to it when I was older.

Jon Case

I’d always loved cruisers and always said that one day I was going to own a Harley. It was never anything but cruisers. No other type of bike interested me. This I put down to being at a very impressionable (read hormonal if you wish) age when Terminator first came out and, of course, there were those Meatloaf album covers!

It just happened – I decided I was going to learn to ride a bike. A bit of research and I was booked onto a DAS with Bike2Bike in Newbury, fortunately a very good choice. I worried about telling my Mum, but she was very supportive. I did my CBT – God knows how I passed that! I really could not get the hang of this ‘clutch with the hand’ thing and spent half my time stalled. The examiner obviously wasn’t watching when I did a wheelie out in front of a car when pulling onto the road for the first time (a buttock clenching moment, I can tell you). Before even thinking about Mod 1 I decided I needed practice. Through Bike2Bike I hired a 125 for a few days, and just spent that time out riding on quiet roads learning to control the bike and that flaming clutch. But I wasn’t enjoying it and that worried me. It felt like the slightest gust of wind would blow me over. I didn’t feel in control. It all just felt wrong.

I decided to persevere, and I did my theory, rocked that – 100% on the test and 76% on the hazard perception, and booked my Mod 1 training and test. The day of the training was a revelation. I started moving on a big bike and it was a eureka moment. This is what I had been expecting. This was what I hoped it would be. This was fun! Soon Mod 1 and Mod 2 were passed, and I was on the bike hunt.

Cruisers! Aah, they’re just great. Many will disagree but that’s the beauty and variety of biking – there’s something for everyone. The look of cruisers, the sound, the ability to mod, the lack of electronic gizmos, the feel of riding one, the low seat position, the admiring looks of passers-by (well, in my imagination anyway) – fundamentally, the feeling and the image! I soon realised though that a Harley was not what I really wanted. Lots and lots of research and Excel spreadsheets followed. For the money I had there were issues with age, reliability, value for money and the lack of performance that money would realise when buying a Harley badge versus other brands. I settled on a 2009 Yamaha XVS950A Midnight Star with 5,800 miles on the clock. This was a lot of bike for the money, and on Wednesday 13th September 2017 I proudly rode home (very tentatively – I bottled parking at the motorway services and drove straight out) and everyone was out!

Roll on a year and I was very happy with my bike, and I still am. She’s gorgeous. Whenever there is something wrong with her I end up a nervous wreck. ‘What’s wrong with her? Is she okay?’ I worry more about her being ill than the kids, but I never said that. And I’d lay money on that there’s a good few of you nodding in agreement. She has that lowdown torque, just the right amount of power for me (okay, it’s a measly 55BHP, but that does me fine, and she keeps up with more powerful bikes without the slightest problem), the wonderful sound I achieved with a new exhaust and hypercharger, the look with the removal of the pillion seat and a few carefully chosen bits of chrome bling.

The simplicity of the bike, not even a fuel gauge after having a car full of toys. A re-modelled seat to make it comfortable after more than 100 miles. The removal of the screen for non-motorway trips. The feeling and the image! I defy anyone to say they haven’t admired themselves in a shop window as they ride past! I was a happy chappy. To quote one of my colleagues at the time – ‘I’m not interested in motorbikes and I don’t like smoking, but you looked cool as **** when you rode out of work yesterday with a fag in your gob’. I can see all the heads shaking in disgust at smoking while riding, but if you position that ciggy just right, there is no ash issue!!

Anyway, I had always planned on getting an advanced riding qualification but wanted some time in the seat first. Starting to ride at my age I was extremely conscious of not having a big metal cage around me. I was also conscious that whilst I had nearly 30 years of driving experience under my belt, and knew how to handle roads and traffic, I was pretty pants at riding a motorbike. I wanted to be a lot better. A friend, John Stevens, who was a member of TVAM until he sadly died earlier this year suggested I join TVAM, so that was what I did.

I was fortunate enough to be allocated Jim Bates as my Observer. He patiently guided me and taught me a huge amount. I’d always thought I was a good driver – not great, just good, but the amount I learned from Jim was astounding, and can be credited to having saved me from one accident that I know of. I didn’t rush it as I worked weekends so it had to be fit in when I could, but in November last year I passed my Advanced test. I just missed out on a F1RST by riding too slowly! But that’s me, and I rode as fast as I personally felt comfortable doing in the pretty grotty November conditions. I’m a much better rider now (and driver actually), but still have plenty I can learn.

BSA C15

So, we finally arrive at the joys of 2020, and me actually getting to the point. I had recently changed jobs and was looking forward to getting more involved in TVAM. Doing various additional courses, going on trips and finally being able to attend St. Crispin’s Sunday. Then 2020 really kicked into gear and all plans went out the window.

I am fortunate enough to be a critical worker and in no danger of losing my job or being furloughed, but we were, and continue to be, affected by Covid. My wife’s business has suffered. My son missed college and had to have assessed BTEC grades. My daughter continues to suffer. She missed a quarter of her GCSE syllabus and still doesn’t really know if her GCSEs are going to happen. My wife’s uncle and our neighbour died of Covid, my friend John Stevens died, and then to top it all my Father-in-Law, Peter, unexpectedly died in his sleep in May.

Peter had numerous vintage bikes in his garage that had not been touched or used for years. My Sister-in-Law decided to take a BSA Bantam and a Triumph Tiger Cub, and my wife asked if I wanted two others. This kind of threw me – I knew nothing about bikes apart from how to ride them. The mysteries of an engine are exactly that to me – mysteries. They would need restoring, they hadn’t been started in at least 20 years, probably more like 25. But they’d been kept inside. Could I do it? Would I have the skills to do it? What on earth is a Rockerbox? Where would I do it? How would I learn? Ultimately, what the hell is a BSA C15 when it’s at home? The questions and doubts kept coming. But the seed had been sown.

Yes, you’ve guessed it, there were two BSA C15s available if I wanted them, a 1961 and a 1967. Time to ask the experts. I joined the BSA C15 Restoration Facebook page. I got, and continue to get, amazing advice from these people. Things like buying the bible according to BSA C15 owners – the Rupert Ratio books which look at the C15 in minute detail. Which tools I would need to get, i.e., Whitworth. I asked advice of the BSA Owners Club and found out that C15s are good bikes for a first restoration as they are relatively simple. Both bikes have matching frame and engine numbers, the 1961 still with its original paint. A couple of posts on the TVAM Facebook page yielded good advice. I picked Jim Bates’s mind on a ride out to the Sammy Miller Museum. It’s really worth a visit, a fantastic place, and if anyone wants to buy me a bike, I’ll have a Zundapp K800 please – I’d love to read Nick Tasker’s take on that bike.

BSA C15

All this was answering questions, quashing doubts and pushing me more and more towards giving it a go. In the end I decided to go for it. A shed/mancave was purchased, a van was hired and then on the 1st November the bikes came to their new home.

On my first day off after bringing them home I got the bikes out of the shed, looked at them, and thought ‘Oh Good God, what have I done?’

But I have dived in there, am making good progress and learning a huge amount. I now know what a rockerbox is. So you can find out what that progress is, I will write some follow ups to this over the next few months to let you know how I’m doing, what adventures I’m having, my successes and my failures. It won’t necessarily be every month as I do have to earn the money I’m spending on them, and it’s a slow process being my first restoration. I am having a thoroughly enjoyable time though and hope you will enjoy reading about it. The strip down of the first bike is well progressed, so next month I’ll give you an update. Bye for now, and stay safe.

Jon Case

First published in Slipstream January 2021