Part Six – It’s Starting to look like a Motorbike!
Last we spoke the bike was slowly starting to come together. So how much would I get done this month? Loads! Partly down to taking a week’s holiday, but also due to the prep and planning I had in place. However, you may remember from last month that there was an elephant in the room. So – first of all……
The gearbox. Oh Gawd. It was time to man up and get it done. My excuses had finally run out. I was convinced that it wasn’t right, and in the end I was correct. I did lots of reading, got advice and finally went for it. I took it apart and started again. Nope, it still didn’t work. Repeat a couple of times and it was sorted, so I sealed it all up. And then there was nothing again. Argh. It took me three days (with initial research, emails, cleaning, exasperation breaks, etc. etc.), but it was time well spent and quite an education. It ended up with all the individual components being laid out and closely examined for defects. They appeared to be in good order, hence it was down to my assembly.
Well at least I knew who the problem was! I started yet again, having been given a specific order in which to assemble. The partially completed whole was working correctly as each individual part was installed. I was being more methodical and taking more time with my assembly, testing the mechanism after each component went in. The final piece went in and it all seemed good. I was now convinced it was assembled correctly, but it still didn’t change gear smoothly. Then a final bit of advice from Mr R did the trick – rotating the mainshaft as I moved the gear change lever. This facilitated the inner workings moving into place. Blindingly obvious when you think about it! When you change gear the engine is running, things are moving and allow the gears to slip into place easily. I was trying to do this without the engine running.


This was a milestone as I could now get the engine back into the frame….and it was loose. Eh? I’d had to engage in a serious battle of wills to get that thing out of the frame and now it was loose? Ah, that was what those random washers were that I’d found on the floor when initially removing the engine. Carefully photographed, labelled and stored as ‘unknown washers – engine area’ (I knew that system would pay off). They shimmed the engine in perfectly. Now it was a lovely snug fit with no movement at all.
You may remember from my second article I talked about the wonders of Small Heath design and the way in which the chain and chainguard were assembled. i.e., having to get your hands under the chainguard to remove the chain before you could remove the chainguard itself. Very awkward and fiddly – perfectly designed to increase the creativity of your vocabulary.
Well, this daft way round of doing things also applies when reassembling, only it’s ten times more awkward, especially when trying to feed a chain over various sprockets whilst they are covered by the chainguard. I mean – why put the chainguard on before the chain? I eventually got it done, but not without having to loosen the rear wheel, do some serious fiddling around, lie on the ground with my head under the bike for a while, cut myself numerous times and maddeningly, scratch a newly chromed part. Fortunately, the scratch is not too obvious, but still, it is infuriating.
This done, I went back to the engine and the drive side. I was hoping that the drive side would be simpler that the timing side and so it was, but it did need new parts ordering. The clutch plates were worn and needed replacing. I also needed new roller bearings and cush drive rubbers for the clutch hub amongst other bits and pieces.
These were all ordered and the wait allowed me to do some planning for the piston. I knew absolutely nothing about pistons, apart from the fact that they go up and down. All this talk of compression ratios, bores, standard and oversize pistons, etc. was well over my head. Again, I had to research and ask questions, read and watch videos. Exchange emails with Mr Ratio, who gave lots of great advice and sold me some original piston rings to replace my broken pattern parts. Feeler gauges and a glaze busting tool were also ordered – my poor bank balance!
Whilst I waited for these to arrive the clutch parts were delivered, so I re-assembled the clutch and alternator. It was then pointed out to me that the primary chain was too loose a fit. Yes, I suppose it was. Dagnamit! Take the clutch and alternator apart again and more parts were ordered. Fortunately this was during my week’s holiday so I wasn’t losing any time. I was waiting for piston and drive side parts and had nothing I could do on the engine. So only one thing for it – the wiring!
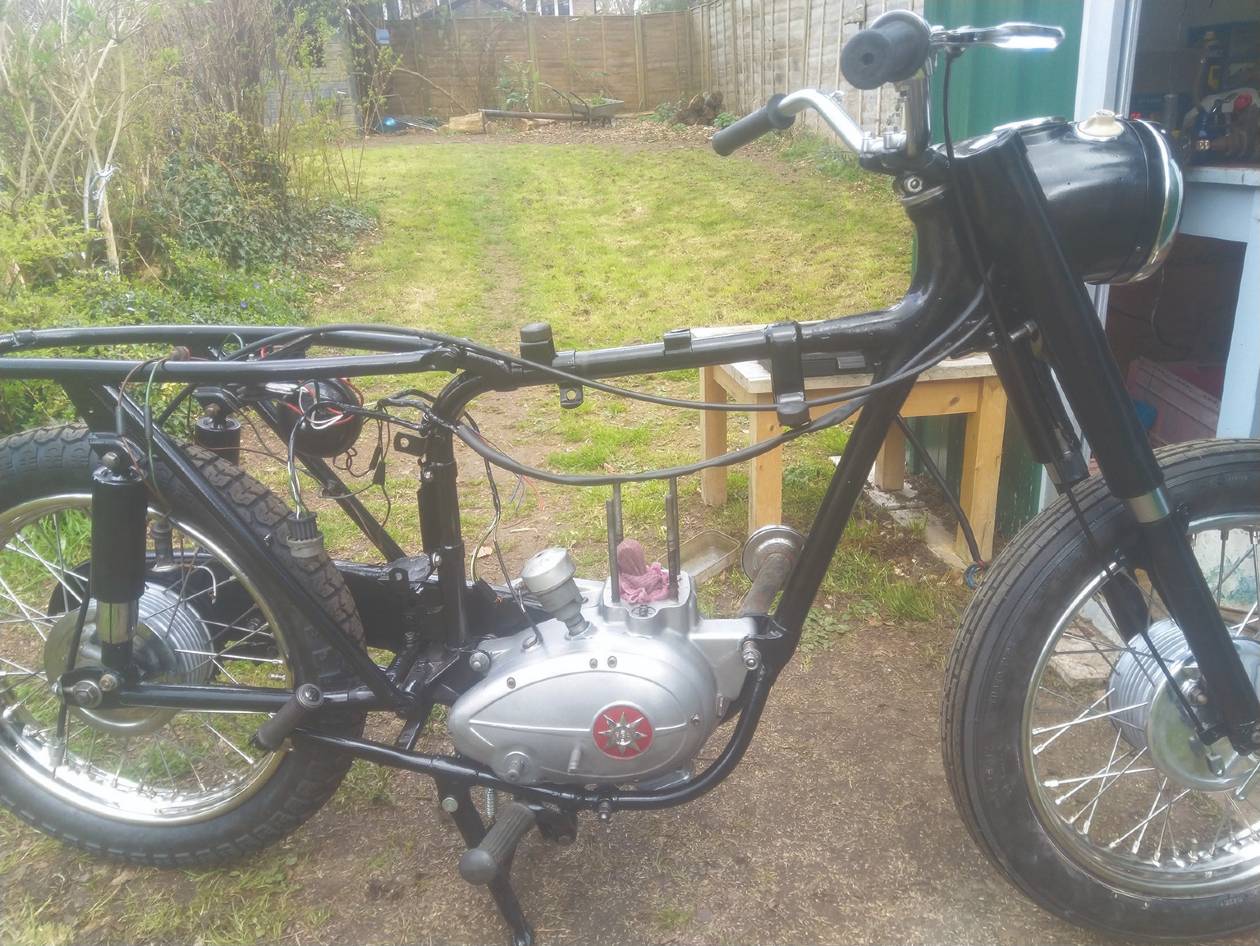
This was something else I had been absolutely dreading. Electronics is a dark art and in my humble opinion, anybody who understands it studied under Snape at Hogwarts. This fear did lead me to being well prepared and planning what to do in advance though. I sourced more than one wiring diagram and, most importantly, went very slowly over two days. I will say that it is wired as per the wiring diagrams. Whether it will work or not is a totally different matter. I haven’t got a clue what any of it means – a green and yellow wire is attached to one of the terminals on the rectifier, etc. That’s all I know. Time will tell as and when I buy a battery and put some juice through the system. Doing the wiring did mean that I could get the headlight finished off though and that’s always nice visually.
I was also able to collect the welded mudguards. They looked a lot better and were soon taken back to Mike at Triple C. Understandably though I had lost my place in his job queue. Having to get the extra work done on these parts meant Mike moved on with his next jobs. Therefore, I will have to wait until he can fit me in again. Frustrating, but it would be unreasonable to expect him to just wait for me.
Whilst finishing the wiring the primary chain arrived, so I was now able to re-re-assemble the clutch and stator. Okay, maybe the old primary chain was too loose. I connected the clutch cable up and the clutch worked – remarkable. Stator wiring was soldered in place. Goo and gasket on, and the drive side was finished. I must add that any future owner of this bike who opens the drive side and looks at my soldering on the stator will wonder what muppet worked on the bike previously. Let’s just say that I’m not very good at soldering!

The piston rings and glazing tool had also arrived, so I went onto the barrel and piston. I had also needed a new gudgeon pin and circlips. The rings went on smoothly, as did the assembly of the piston, gudgeon pin and conrod. Then it was time to anneal the copper gasket and put the barrel on. Annealing – this was something else I hadn’t done. Videos showed that it should be fairly easy, but I didn’t have the necessary heating equipment. After previous disclosures in this fine publication, I was banned from the kitchen under threat of actual bodily harm and maybe even the silent treatment. I fluttered my eyelids but that failed miserably. So it was time to improvise again and out came the camping stove! Fortunately it worked nicely, and it was as easy as hoped.
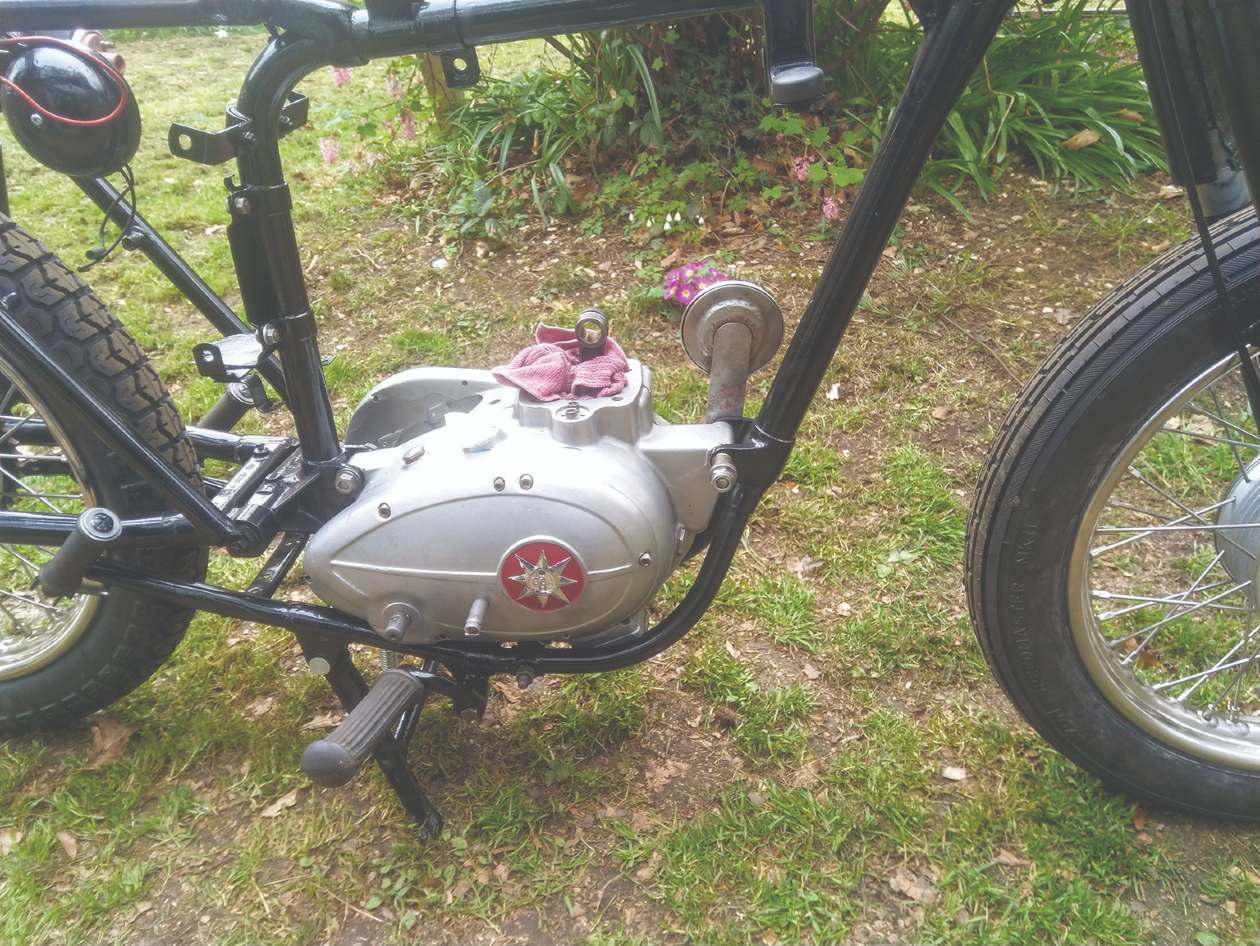
With the piston in and the barrel on, it was time to finish off the timing side by putting on the kickstart and gear change levers. Now the timing side, drive side and barrel were finished and I could see if the engine turned over. And joy of joys, it did! The rear wheel went round, the gears changed and the piston went up and down. This building a motorbike lark might actually work!
Now I could move on to the final part of the engine – the head which included the valves, valve springs and the part I had questioned the existence of in part 1, the rocker box. The valves themselves were black with carbon, but a good soak in petrol and some gentle persuasion gradually removed it all and they were okay. They fitted nicely in the valve guides, (which was a mighty relief), as needing to redo these would have been a major issue for me. I did need some new springs, as the old ones were too compressed, but everything else was in good order. Dave, of Rupert Ratio fame, supplied me with some NOS (New Old Stock) springs, still in their 50-odd year-old grease. He also suggested that I grind in the valves regardless so that I was confident of a good seal. This needed a new tool, which always holds a bit of excitement. Then I discovered that this expensive piece of equipment was actually a rubber sucker on the end of a stick. Phew!
So, the valves were ground in and fitted, along with the springs and the rest of the cylinder head parts. The rockers were taken out of the rocker box to be cleaned and once they were put back in the two parts could be put together and inserted into the frame with the rest of the engine. The engine block was complete.
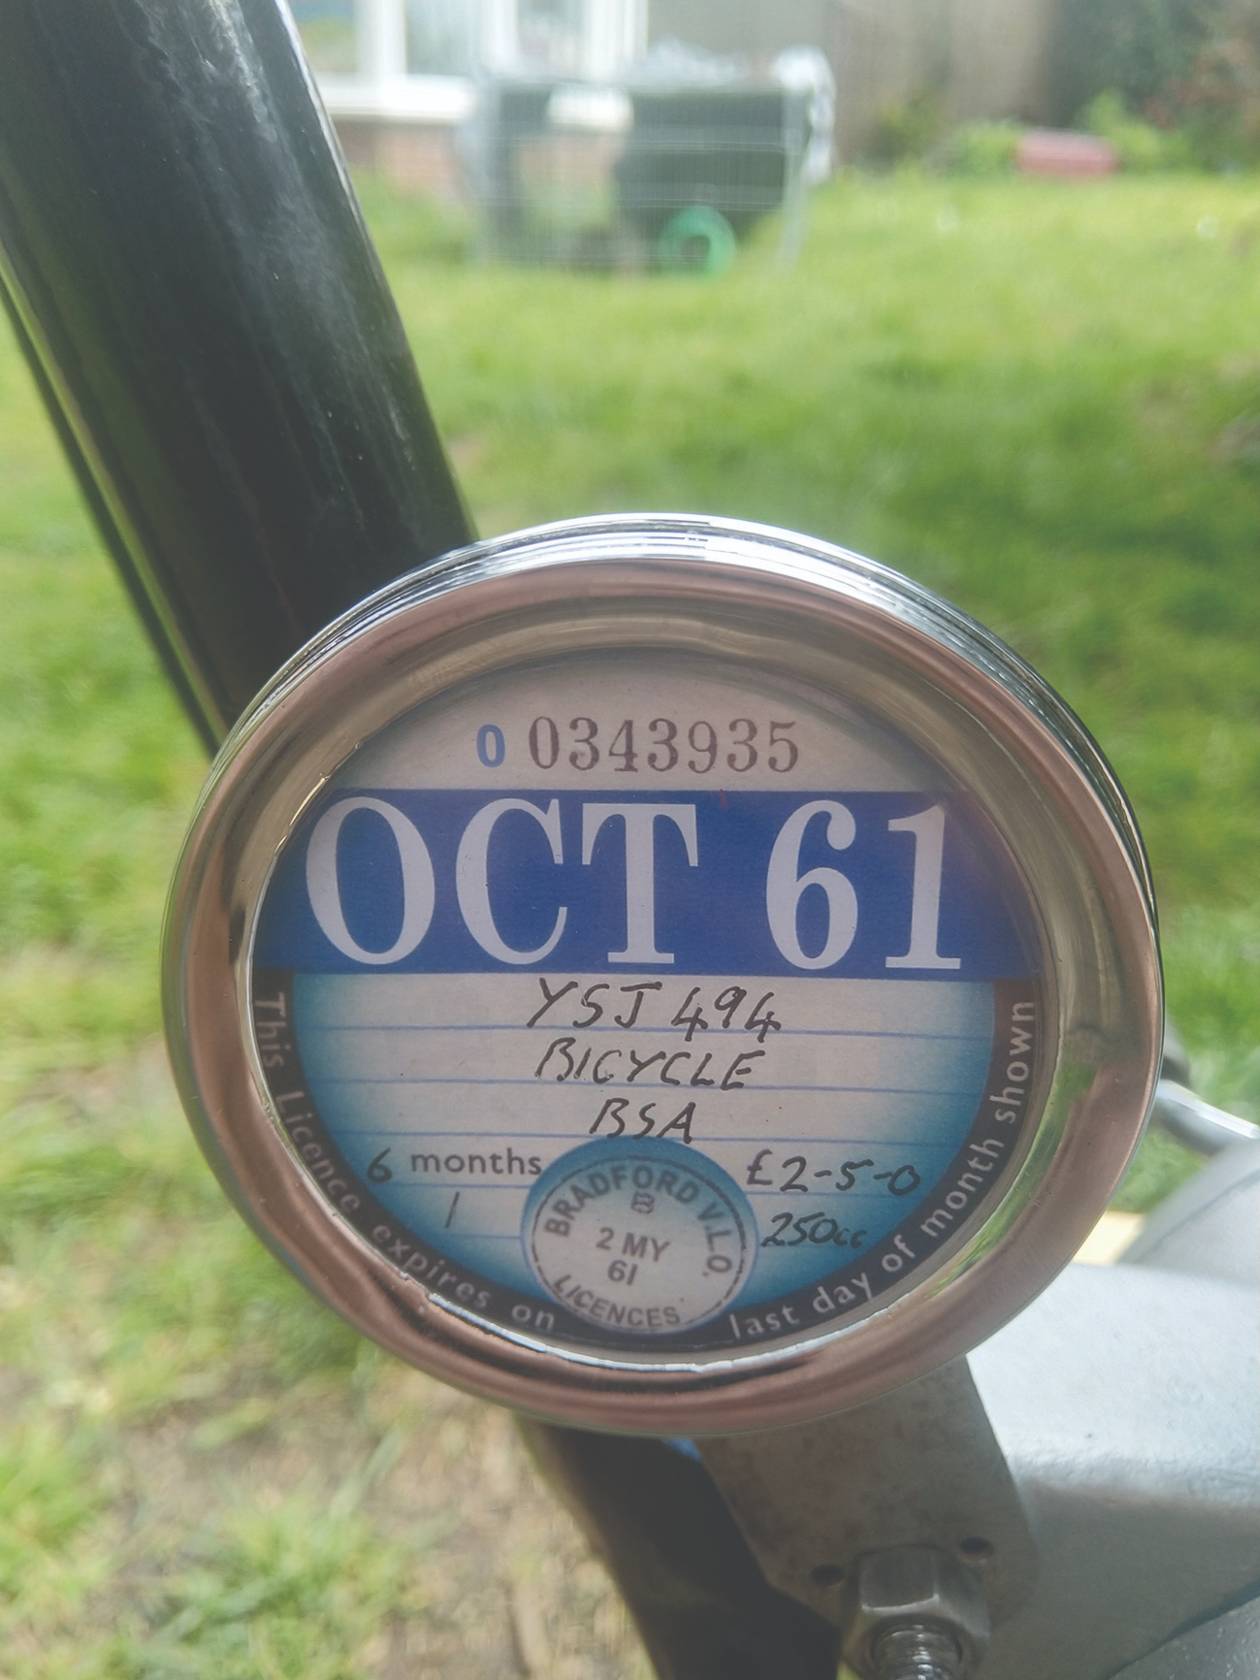
The final thing I managed to do this month was a nice bit of bling. The bike had an empty tax disc holder, but obviously tax discs are a thing of the past. I found somewhere that can reproduce year accurate tax discs. So I got a tax disc for 1961, the year the bike was first sold and the issuing stamp to be Bradford. When I first bought the bike and gave the engine and frame numbers to the BSA Owners Club, they had told me that the bike was originally sent to a dealer in Bradford from the Small Heath factory. Although I did find out that the bike has probably been re-registered at some stage, as its registration number is an Isle of Bute number, these historically unused numbers are often used as age-related re-issues.
And that’s you up to date. I’m going to leave it open as to whether I write anything next month. The fact is that I made so much progress on the engine this month that I only have the valve clearances, distributor and carburettor left to do engine-wise, which is not enough to fill an article. And I can’t really do any more on the frame until I have the tinware back and I don’t think that will be this month.
So, I’ll leave it open. If the tinware comes back earlier than I expect, I’ll be here next month. If not, I’ll see you in a couple of months. Keep safe.
Jon Case
First published in Slipstream June 2021
